Building Custom Floating Window Apps for Caller integrations
1. What is a Floating Window?
As the name implies, Custom Floating Window is a draggable and movable iFrame rendered over the Pipedrive Web UI. It also persists when the user is navigating around Pipedrive and is always accessible from the top bar section (also known as – App Dock). This extension is suitable for use cases that involve Caller / Telephony, Messaging integrations. However, it is not limited to that and is a canvas open for interesting uses.
A Custom Floating Window is similar to a Chrome extension with a critical difference in that it integrates more natively into the Pipedrive UI. This takes care of authentication and context passing, which are challenges on their own when it comes to implementing them separately in browser extensions.
Note that the family of Custom UI extensions also includes Custom Modals, Panels, and Settings page. We expect you to pick the right extension depending on the use case. If this excites you, we have a lot to offer to ensure that you are successful in building apps.
What you'll learn
- How apps built using Floating Window look like.
- How you can try it out almost instantly.
- A high-level architecture for building such apps.
- About the Custom UI extensions SDK, events & methods.
- Authentication flow for Floating window apps.
- Inbound and Outbound caller interactions.
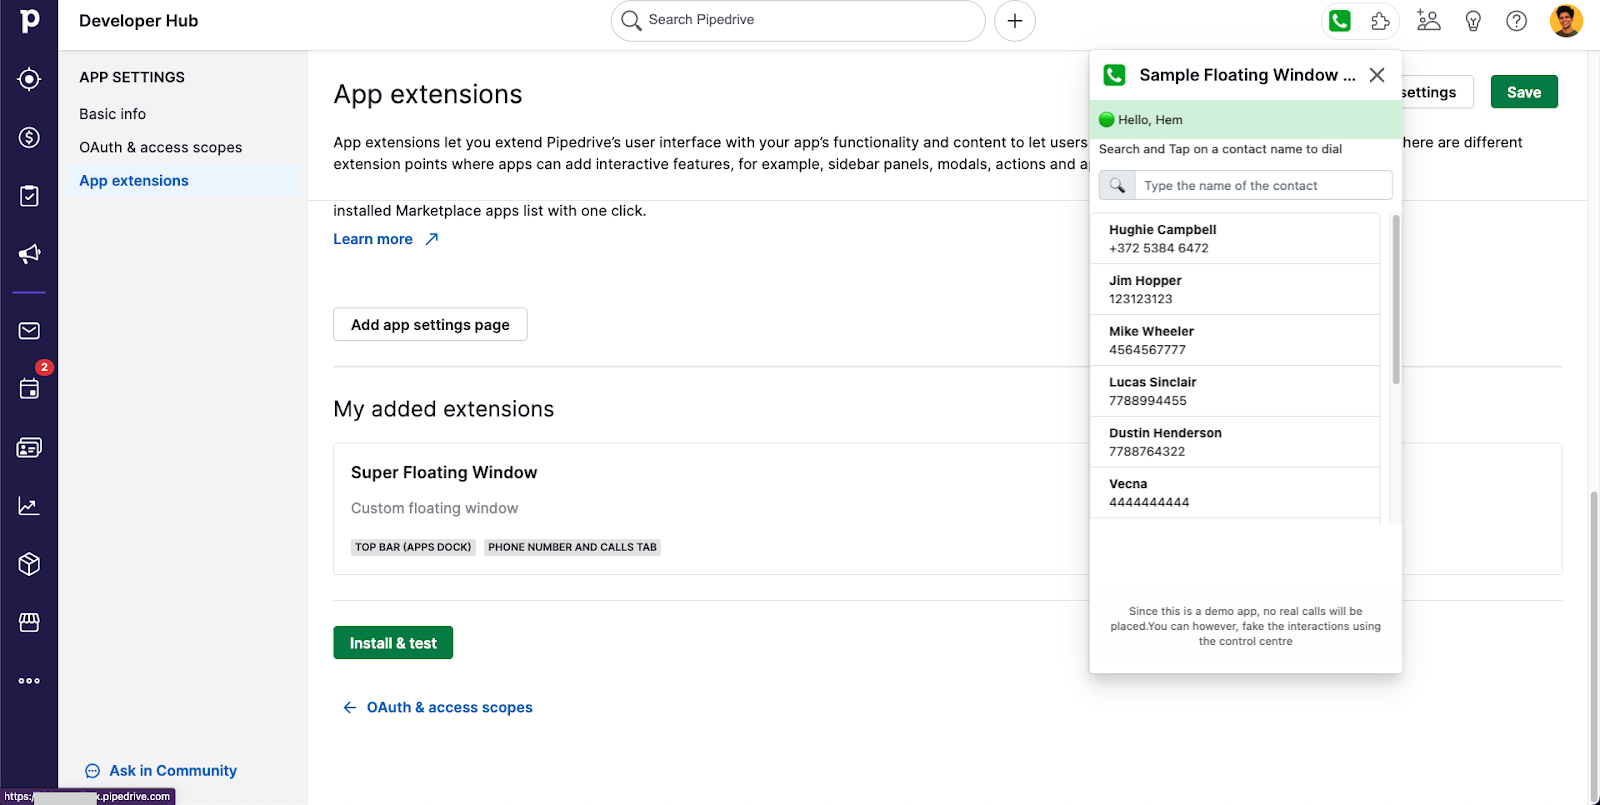
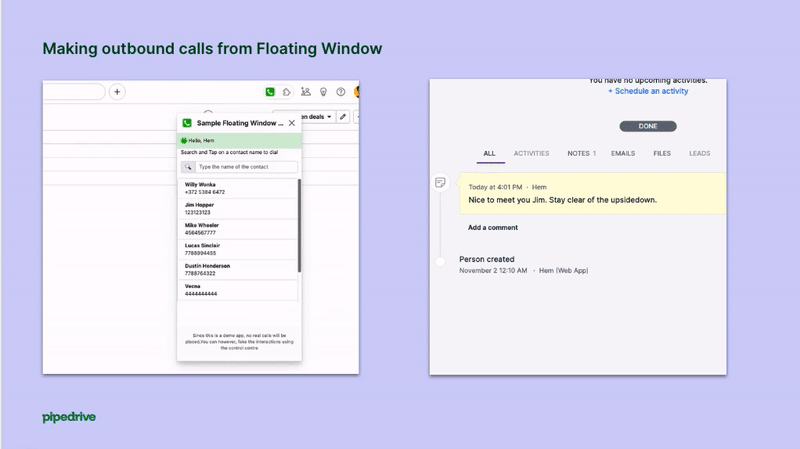
2. Here's how a sample Caller app looks
A sneak peek into what the finished app looks like:
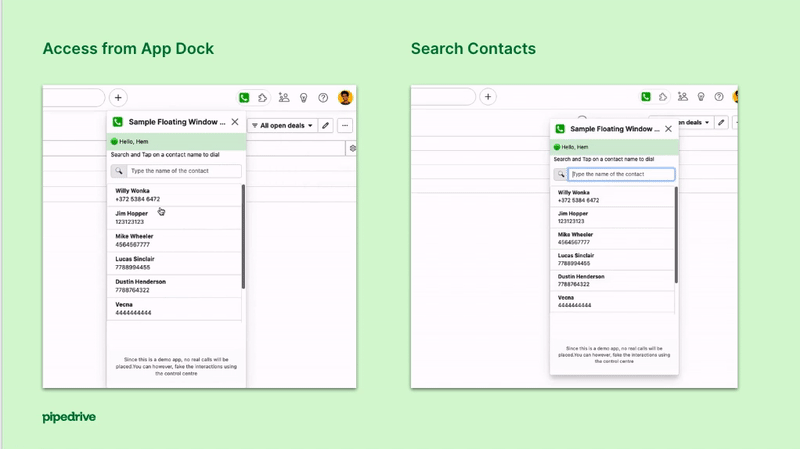
As you can see, the Floating Window app is invoked from the App Dock. You can also dynamically control its visibility and appearance using the SDK.
You don't have to wait until the end of the tutorial to try it out. In the next step, you will find instructions on how to run the app without even touching your local IDE / Code Editor. This would give you a quick and realistic experience of how the app works behind the scenes.
3. Why wait? Try it out now!
To get started with the Pipedrive App, make sure you have a Sandbox Account with Developer Hub enabled. You can start building the app right away from the browser using Gitpod.io.
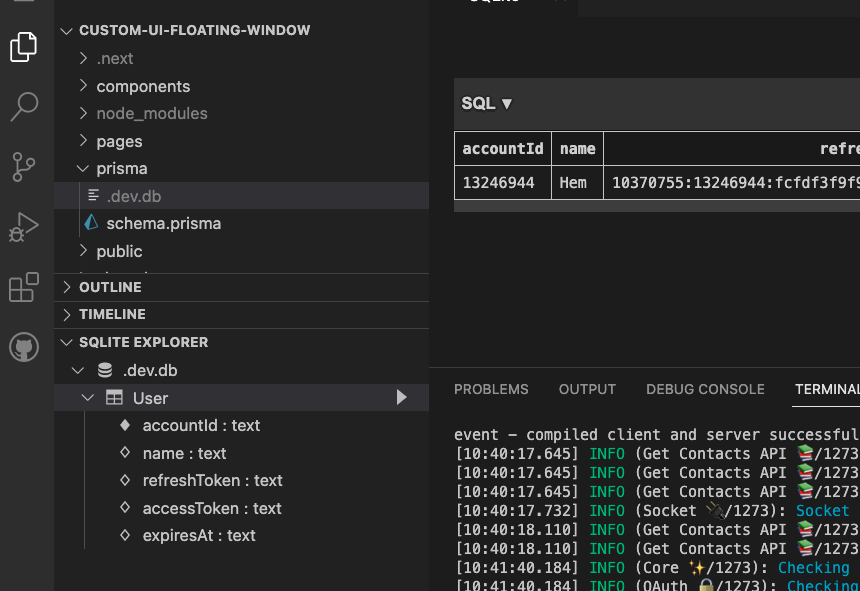
To register an OAuth app in the Pipedrive account, please follow these steps. Make sure that the app has the following scopes: Basic, Deals (Full access), Activities (Full access), Contacts (Full access), Search for all data and Phone Call integration. In order to configure the callback and floating window URL, look at the terminal window in the Gitpod browser IDE. It should look like this.
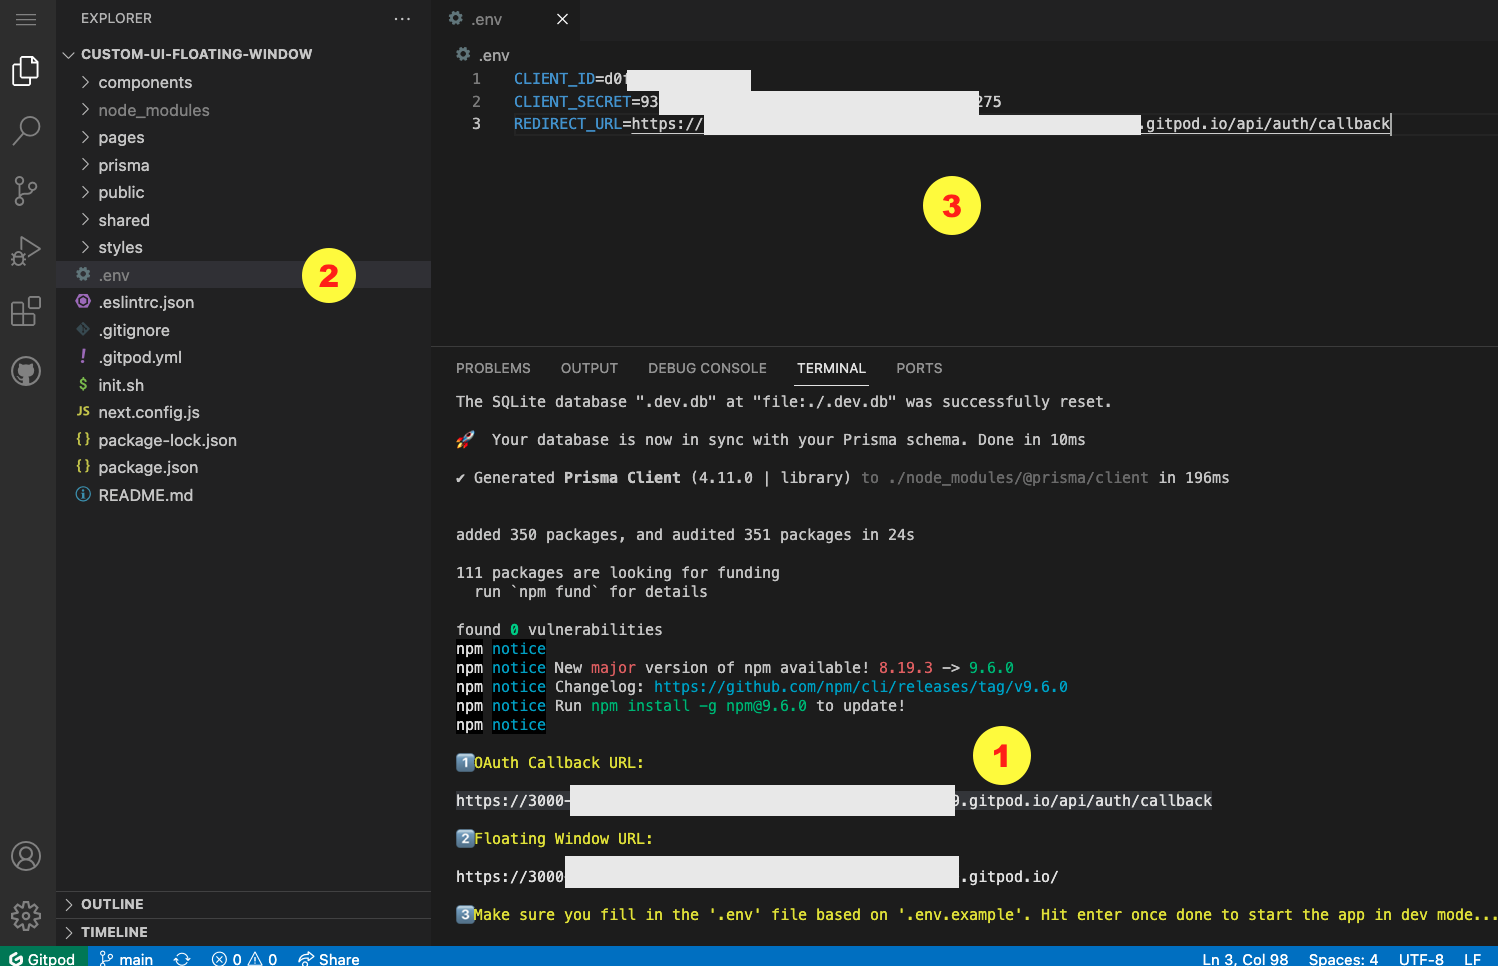
Specify the Callback URL during Pipedrive app creation. It should be in this format:
https://[YOUR_APP_URL].gitpod.io/api/auth/callbackSimilarly, in the App Extensions section, create a Custom Floating Window. You can provide the URL shown in the format below. Choose the Top bar (apps dock) and Phone number and calls tab as entry points.
https://[YOUR_APP_URL].gitpod.io/Make sure you create a .env file based on the .env.example based on Client details and Callback URL. To start the app, hit 'Enter' or press any key in the terminal.
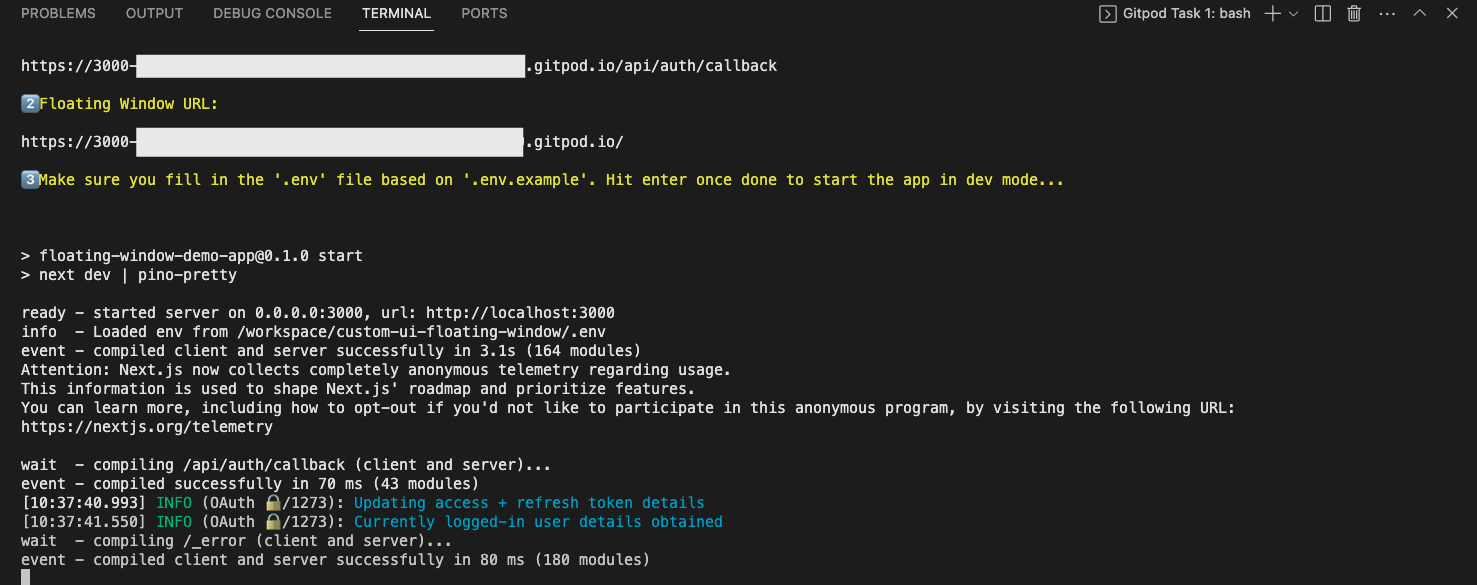
There we go, the app is live! In the next section, let's look at some important details starting from the high-level architecture.
4. High-level architecture of the demo caller app
The Floating window app works very similarly to any other Custom UI application. Functionally, the app is capable of rendering the list of contacts in Pipedrive which can be used to initiate outgoing calls. The app can also receive inbound calls based on a simple simulator we have built. During the call, one can perform several activities - such as taking notes, saving the contact and so on.
On a high level, Pipedrive renders the iFrame associated with the floating window extension inside the product UI.
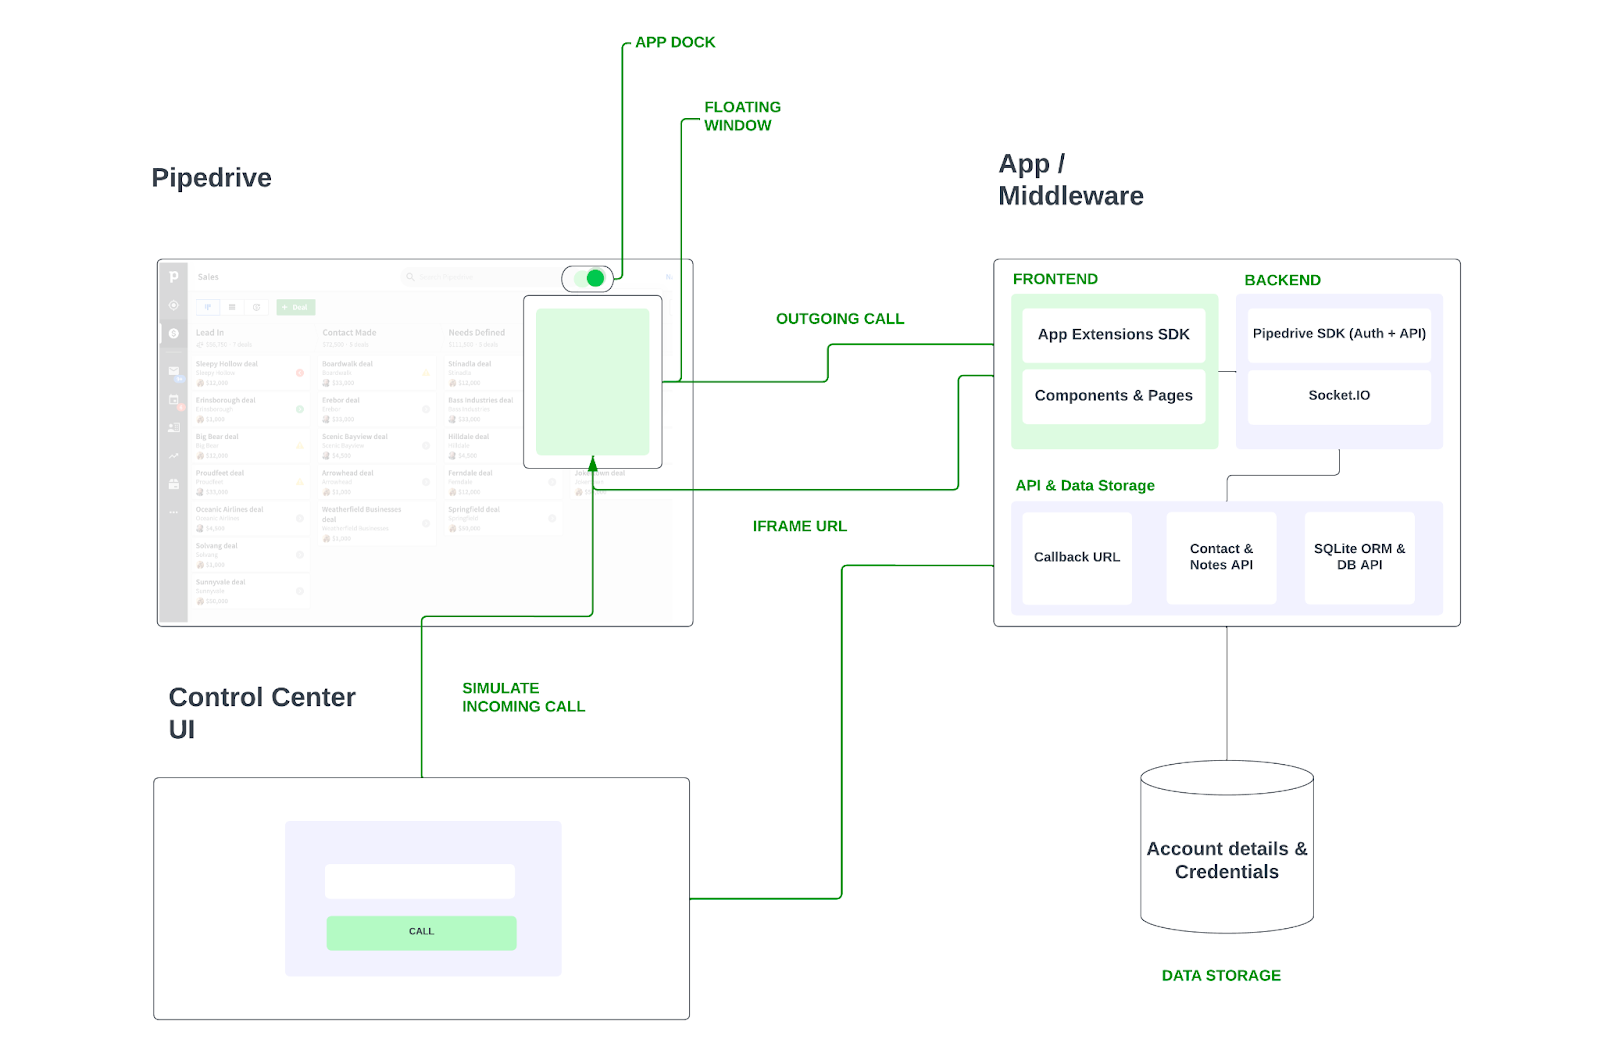
The callback URL and floating window iFrame URL correspond to a middleware. The middleware contains the required logic for rendering the iFrame and the APIs. In our case, the middleware is a Next.js app. The UI is composed of components and pages and makes use of API routes to interact with Pipedrive. We also make use of Pipedrive Node.js API client to handle authorization and API interaction.
The middleware is also capable of handling authorized account credentials. The app is a mock and doesn't connect to a VoIP provider. Thus it only mimics the outgoing and incoming call flows. To simulate incoming calls, we make use of a simple Control Center UI that uses web sockets. The app also makes use of cookies to store the access tokens and re-use them for making Pipedrive API calls. Upon the expiry of access tokens, a new one is generated for the session using the refresh tokens.
The mock can also be used to integrate with actual Caller integration providers such as Twilio, Vonage etc.
5. Meet the Custom UI extensions SDK
The App Extensions SDK facilitates the interaction between the Custom UI and Pipedrive. Our app makes use of certain methods and events to support caller integration. Custom UI apps need to initialize using the initialize method regardless of the app extension. In order for the Floating window to be rendered properly,
- Authorization should be successful
- App Extensions SDK should be used and should be initialized
- The iFrame should load within 10s
A complete flow of interaction between Pipedrive and the App that we built is shown below:

The app also makes use of visibility methods to show and hide the floating window. We can also listen to the changes in visibility using dedicated event listeners. The redirect and set notifications methods are also helpful in navigating to the corresponding deal or contact in Pipedrive and setting notifications in the app dock section.
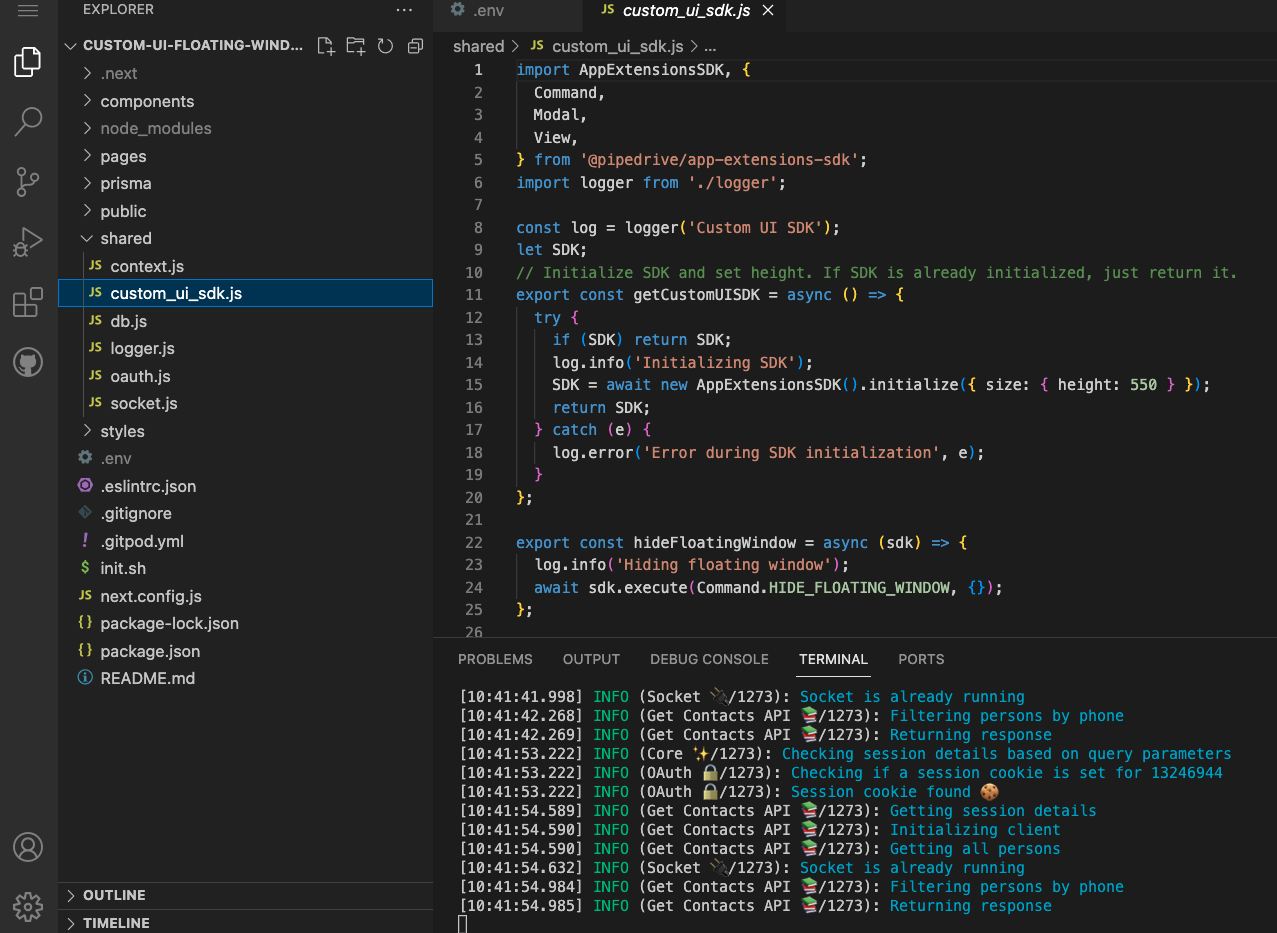
You can find further information regarding the methods used in the /shared/custom_ui_sdk.js file.
6. Middleware and server-side logic
The Next.js app contains both the front end and the back end. The components directory contains the necessary UI views for the app. As mentioned before, we make use of these components in conjunction with App extensions SDK to render them successfully.
The pages/api directory contains the API routes required for interacting with Pipedrive. The API routes make use of Pipedrive Node.js API client to make REST API calls. In order to simulate real-time communication, we make use of socket.io.
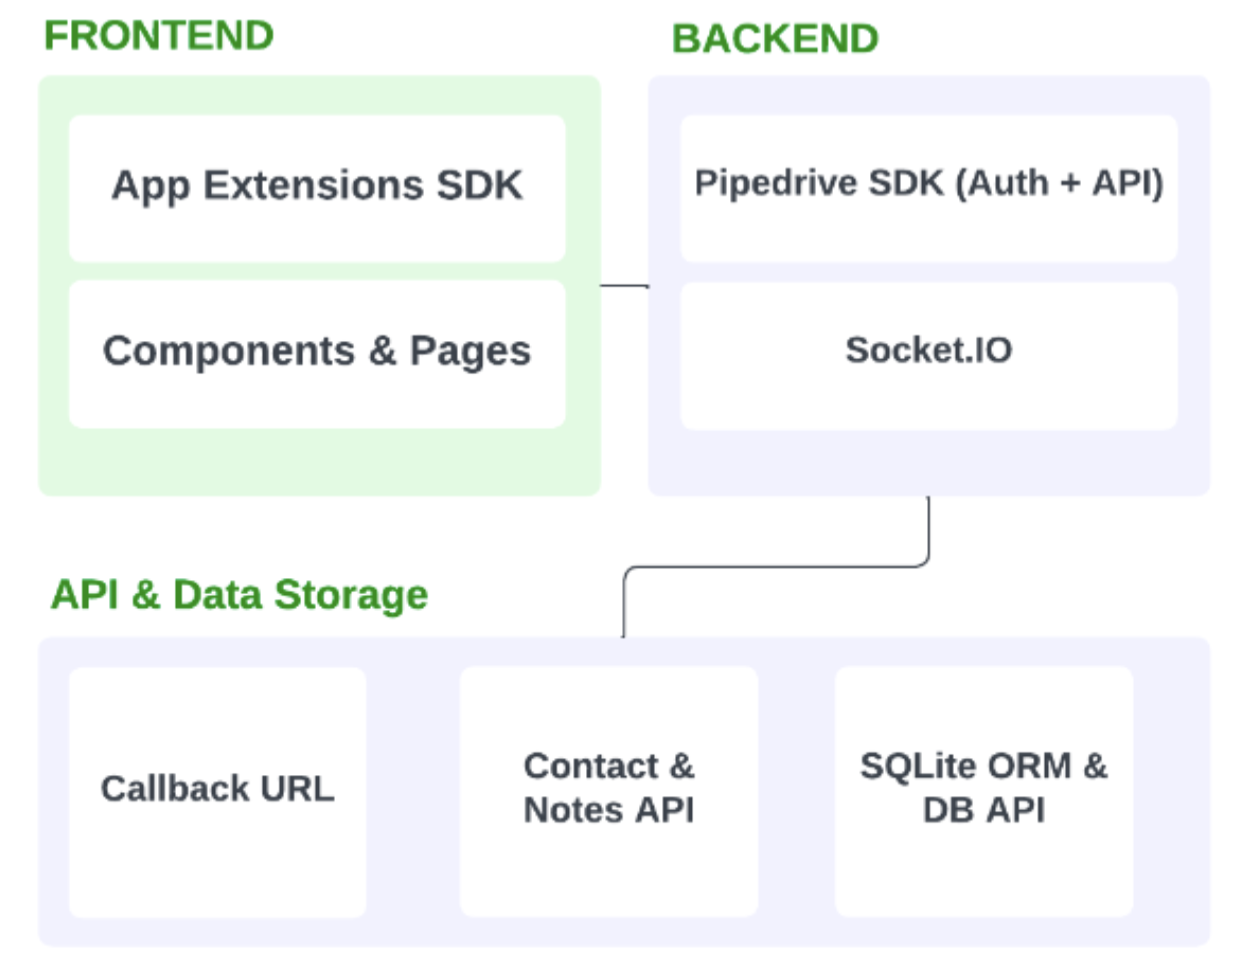
The shared directory contains the necessary utility files for interacting with the database, socket.io, app extension SDK and the logger. To simplify data storage and credential management, we make use of Prisma ORM to persist data in an SQLite database. The schema and the database can be found in /prisma/schema.prisma.
prisma/schema.prisma
generator client {
  provider = "prisma-client-js"
}

datasource db {
  provider = "sqlite"
  url      = "file:./dev.db"
}

model User {
  accountId String  @unique
  name  String?
  refreshToken String?
  accessToken String?
  expiresAt String?
}
You can also inspect the database content using an SQLite database viewer plugin
7. Authorization concepts and flows
Depending on the use case, your app might have the need to persist credentials for different accounts. Floating window apps also have a UI that makes user-based access an important part of the app logic. To simplify things, authorization can be approached in the following way:
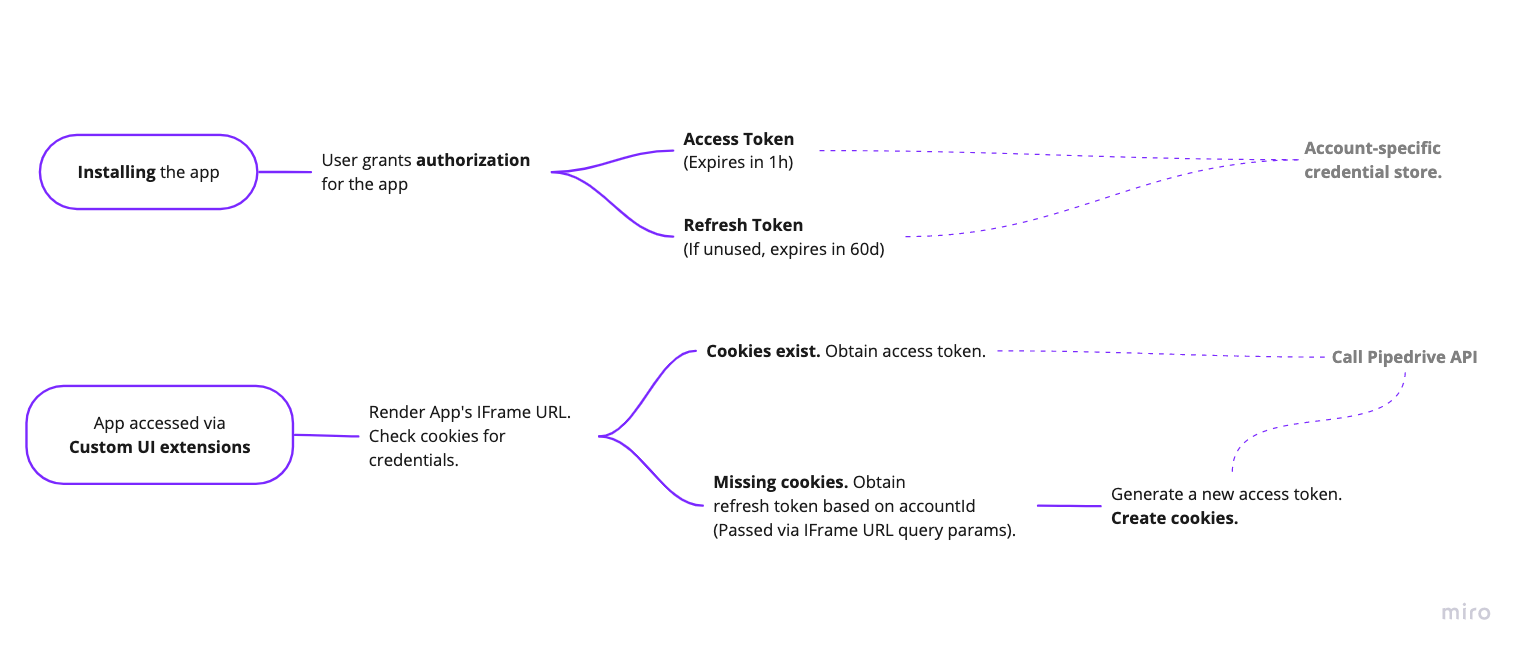
- During the time of installation, you need to obtain the user's consent and the token pairs (access & refresh). You can make use of the Pipedrive API clients to achieve this. In our case, the respective logic can be found in the
shared/oauth.jsfile. - Since multiple users would authorize your app for their respective accounts, it is essential to maintain account-based credential management. In our case, this is simplified by storing the details based on
accountId. - If your app needs to perform sync/ ad-hoc data retrieval activities, ensure a valid access token. Each access token lasts 1 hour and would have to be refreshed after expiry (hence the need to store refresh tokens)
- If your app relies on role-based access, you can leverage the way custom UI apps work. Each custom UI extension passes
userId, companyId,andtokenvalues every time it loads the iFrame URL. In our case, we make use of these details and persist the account-specific access token in cookies. This approach makes it possible to have stateless sessions in Custom UI extensions. - Depending on the access token expiry, you can set the maxAge for cookies that would automatically erase & renew them periodically. The Next.js API routes make use of these cookies to make secure API calls.
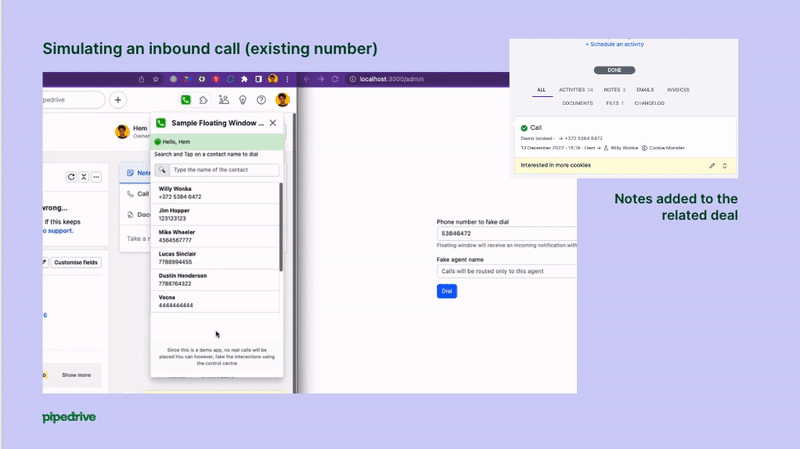
8. Outbound call flow 📱
The Floating window app utilizes the Pipedrive Node.js API client to display a list of contacts. Users can click on a contact to initiate a call, and the app automatically switches to the Dialer screen. Depending on the contact's status & existing deals, users are presented with different options, such as adding notes to the contact or adding notes to the deal. When the call ends, notes are automatically added. The user also has the option to simply Hang up without doing anything.
Here's how the Dialer changes based on the contact and deal association status:
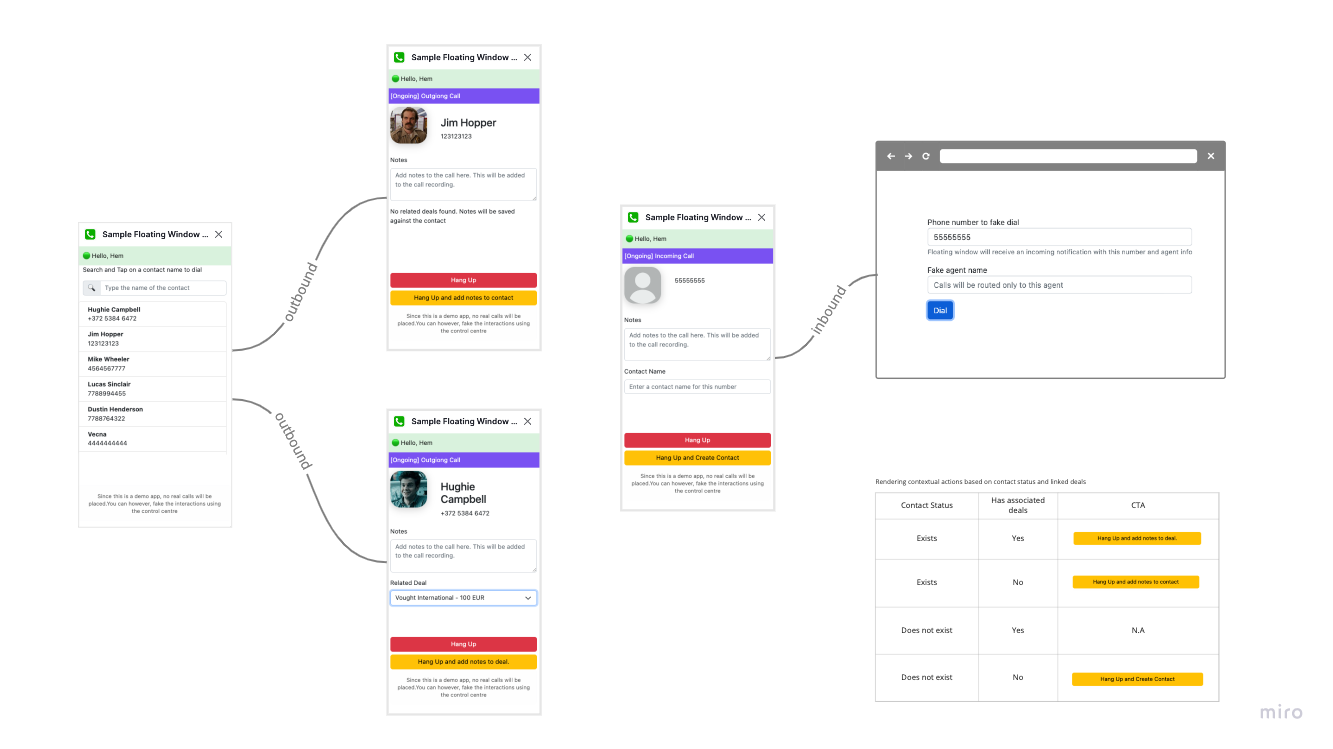
The Dialer component is made up of a set of components (ActionButtons, CallerDetails, CallStatus, & Footer) which work together based on the context provided to them. For instance, the ActionButtons component renders different buttons depending on the state.
components/Dialer.js
...
    <div className="vh-100">
      <nav className="navbar navbar-light bg-mildgreen">
        <div className="container-fluid">
          <span className="navbar-brand"> 🟢 Hello, {props.user.name} </span>
        </div>
      </nav>
      <CallStatus {...props} />
      <CallerDetails {...props} />
      <div className="fixed-bottom m-2">
        <ActionButtons {...props} />
        <Footer />
      </div>
    </div>

...
You can also find further details about how the app makes use of the REST API inside the pages/api directory. Here's the ActionButton component initiating a call to an API route that we have in the app. Note that we do not pass any sort of credentials in the header or in the body. This is due to the fact that the credentials for the stateless session are securely stored in the cookies.
components/Dialer/ActionButtons.js
...
  const createNewContact = async () => {
    const notes = document.getElementById('notes').value;
    const name = document.getElementById('contact_name').value;

    const newContact = await fetch('/api/addContact', {
      method: 'POST',
      headers: {
        Accept: 'application/json',
        'Content-Type': 'application/json',
      },
      body: JSON.stringify({
        name,
        number: props.callerDetails.number,
        notes,
      }),
    });
    const contactObj = await newContact.json();
    const contact = contactObj.data;

    props.setCallerDetails({ ...props.callerDetails, id: contact.id });
    props.setCallerState('disconnected');
  };
...
The getAPIClient() method obtains the access token from the cookies. Since we are setting the maxAge for cookies, they expire automatically. The same method is also responsible for refreshing the token and obtaining a fresh set of credentials.
pages/api/addContact.js
...
    log.info('Getting session details');
    const d = req.body;
    const client = getAPIClient(req, res);

    log.info('Initializing client');
    const api = new PersonsApi(client);

    // Create contact
    log.info('Creating contact');
    const person = await api.addPerson(
      NewPerson.constructFromObject({
        name: d.name,
        phone: [
          BasePersonItemPhone.constructFromObject({
            primary: true,
            label: 'work',
            value: d.number,
          }),
        ],
      })
    );
...
9. Inbound call flow 📲
In order to simulate inbound calls, we rely on WebSocket communication. Websockets allow bi-directional real-time communication between server and client without the need to poll a particular endpoint.
The app has a simple Control Center capable of initiating calls based on the mentioned phone number. The Control Center UI looks like this:
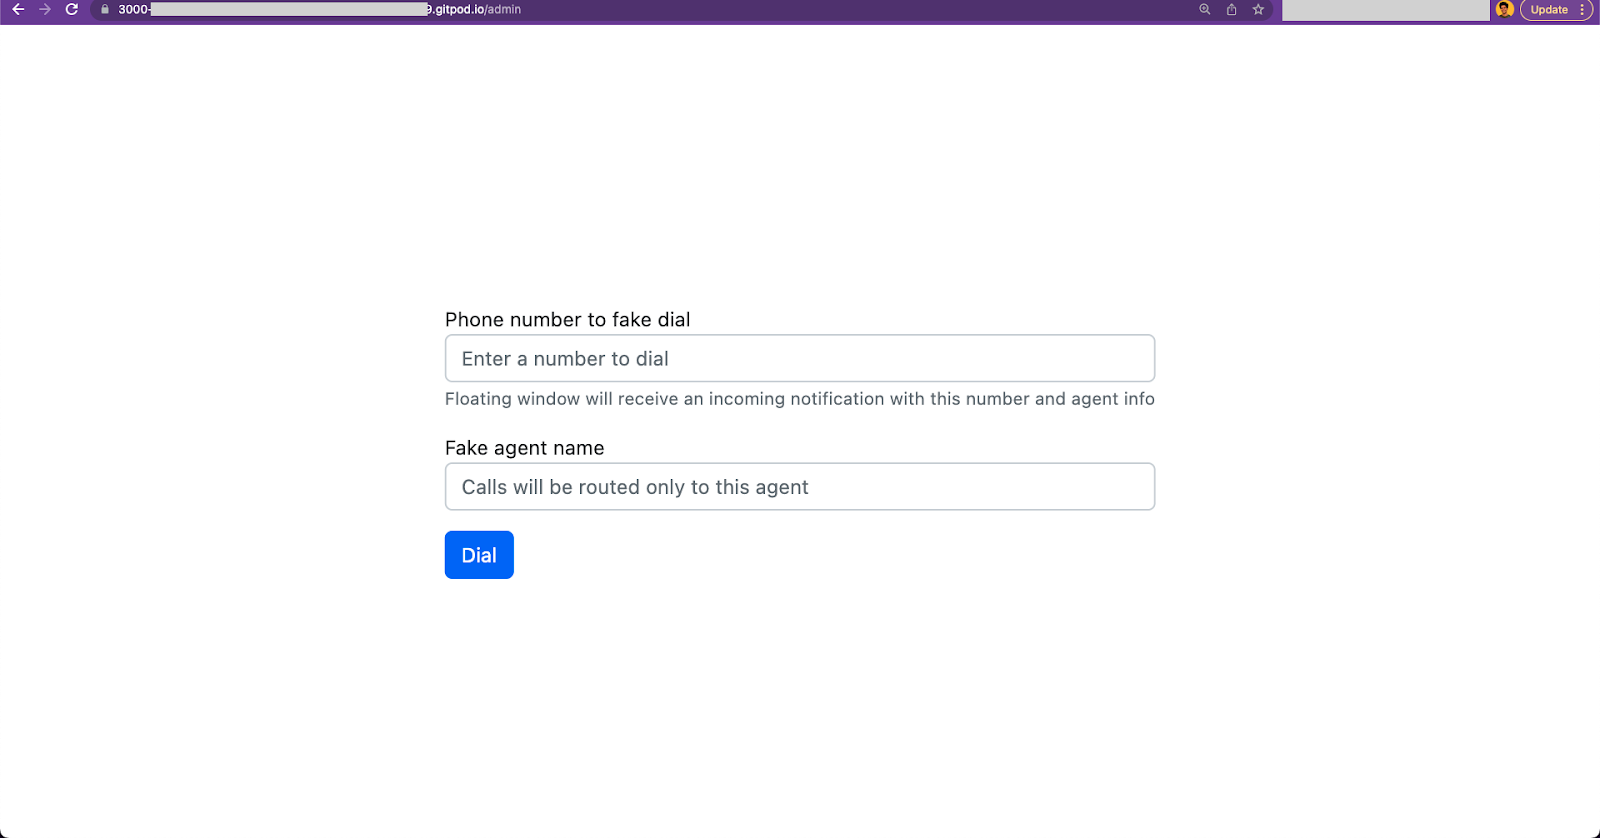

You can access this page via the following link
https://[YOUR_APP_URL].gitpod.io/adminHere's how the communication works:
- The app utilizes a socket event,
INBOUND_CALL, triggered by clicking the 'Dial' button (from the Control center UI), with a phone number and an optional agent detail for routing. - The floating window iFrame listens to the
INBOUND_CALLevent and uses the App extension SDK methodsdk.execute(Command.SHOW_FLOATING_WINDOW, {});to change visibility. - The Dialer UI is rendered based on the incoming caller's details, displaying appropriate actions.
pages/admin.js
...
  const socket = io();
  const dialPipedrive = () => {
    const number = document.getElementById('number').value;
    const agent = document.getElementById('agent').value;
    socket.emit('INBOUND_CALL', { number, agent });
  };
...
Note that it is important to consider the current state of the Dialer into account. If the user is already on a call, it is recommended to list them as missed calls or handle them in a different way without affecting the existing call.
shared/socket.js
...
    socket.on('INBOUND_CALL', (...args) => {
      log.info('Receiving incoming call...');

      if (props.callerState === 'listening')
        startIncomingCall(props, args[0].number);
      else {
        log.info('Cannot place a call when a current call is in progress');
      }
    });
...
10. Your turn
This tutorial explored a simple Caller integration using the Floating Window App extension. With the ability to integrate different functionalities such as messaging, note-taking, productivity tools, and more, the Floating Window & Custom App extensions can revolutionize how we interact with Pipedrive.
We encourage you to contact our developer community if you have any feedback or ideas for new use cases. Together, we can continue to push the boundaries of what is possible with the Floating Window App extension!