Building a Pipedrive CTI app with Twilio
1. Introduction to building phone apps
Communication is at the heart of sales and marketing activities regardless of the size of businesses. It's no wonder that there are several phone solutions, predominantly cloud-based, catering to the needs of such businesses.
In this tutorial, we will build a simple integration with Twilio to make it easy for salespeople to initiate calls from the web app. These types of integrations are also referred to as Computer Telephony Integration (CTI) and allow greater coordination with Pipedrive. CTI is based on Voice over IP (VOIP) technology which makes use of the Internet to perform phone calls.
Ways to incorporate CTI in Pipedrive
With Pipedrive, you have 2 major ways to incorporate phone solutions.
- Using the Developer Platform and REST APIs: Pipedrive offers complete extensibility to build your own integration. Using a combination of platform features such as Webhooks, App Panels, and APIs you can build holistic solutions.
- By configuring the
`callto`syntax: You can also make VoIP calls by configuring the`callto:`syntax. For instance, you can make a call through facetime or via the default phone using`facetime://[number]`or`tel:[number]`syntax.
We will approach this tutorial in steps that can be easily understood. Here's a high-level overview:
What you'll learn
- Extending the Pipedrive Boilerplate App as a phone solutions app
- Configuring vendor platform (Twilio) to use them in our app
- Adding API routes to authenticate with Twilio and handle voice calls
- Building a frontend using Bootstrap to dial and receive calls
2. Before we get started
Before we start on this journey of building a phone solutions app, there are a few prerequisites that need to be taken care of.
To give a technical overview, we will be building a Node.js app that uses Javascript for both frontend and backend. The app will run in Glitch and requires no local setup (Yay!). We also need to create trial accounts for Pipedrive and Twilio (CTI vendor) which should not take more than a few minutes. Here are the links for reference:
3. Setting up Glitch and the environment
Make sure you remix the Glitch app to begin. Glitch allows you to build the app from the browser without having to use your local development setup.
Once you have remixed the app, you need to wait for a couple of minutes to let Glitch prepare the environment. You can click on the Logs tab in the bottom footer to see the console logs. If you see a message saying that the `🟢 App has started` as indicated by red circle 1 in the image below, it means that the boilerplate app is ready 🙌
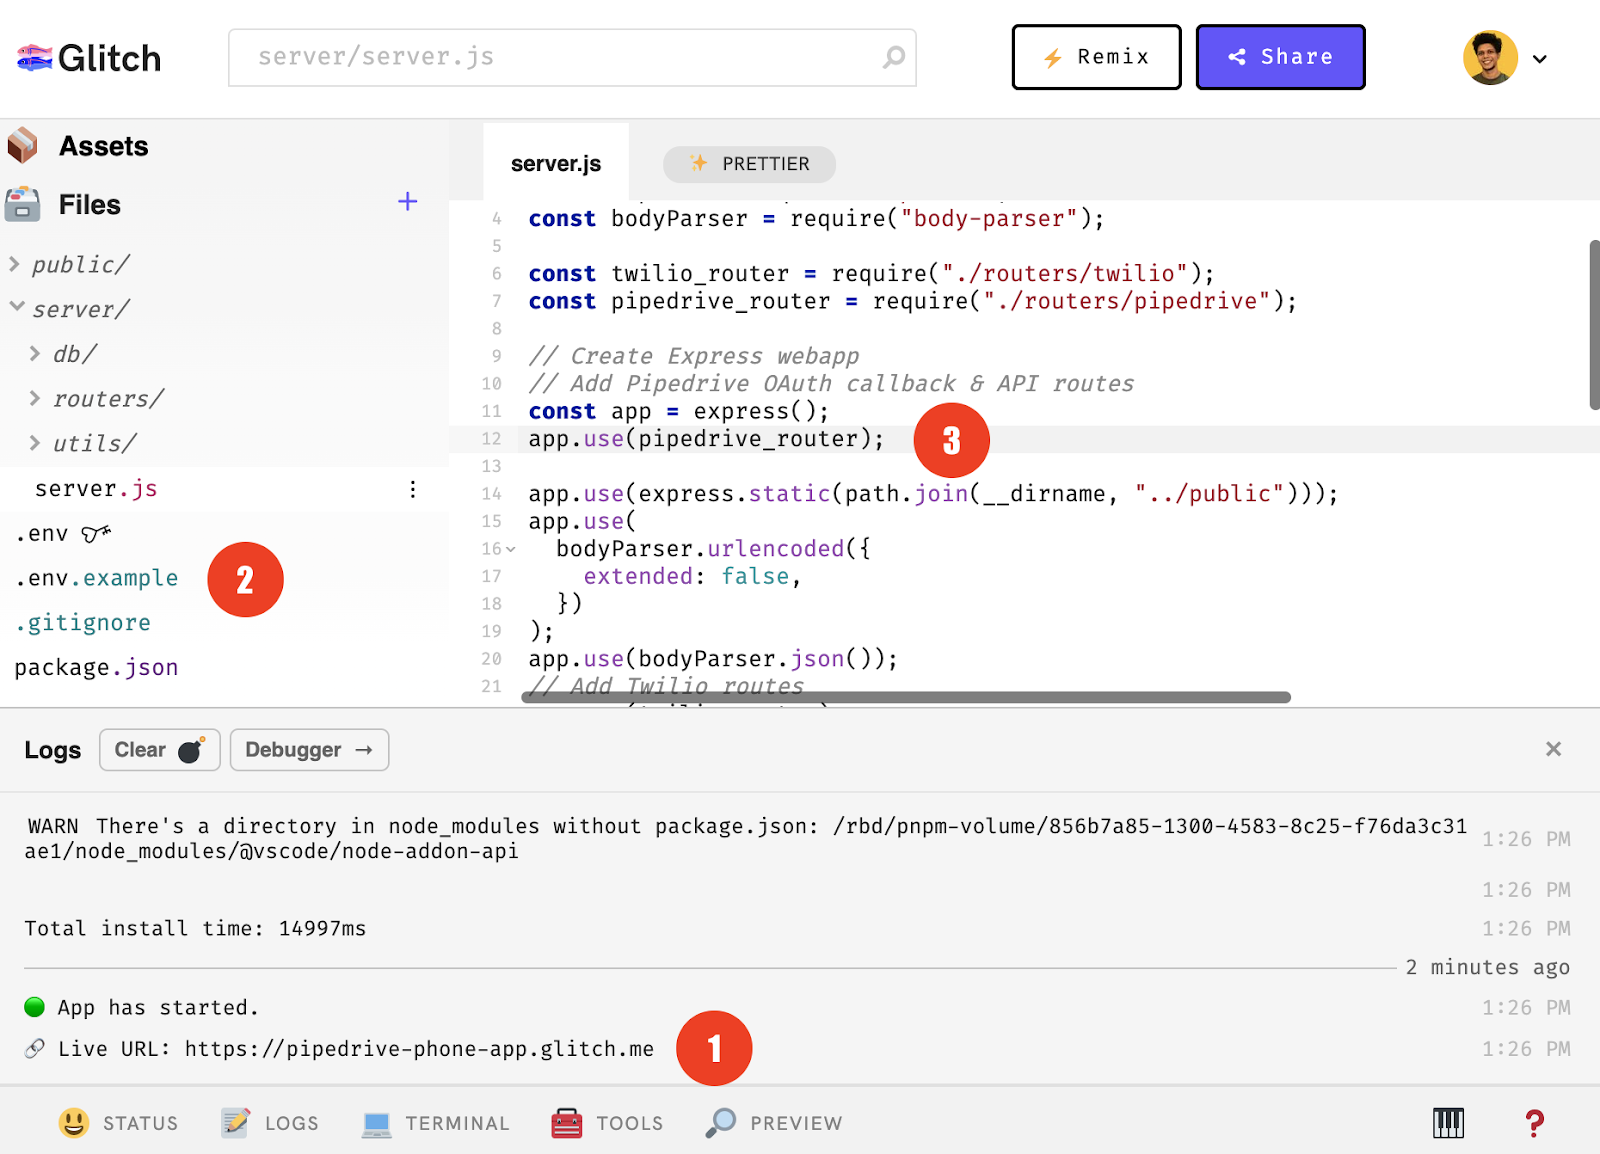
Please take note of the Live URL. This will be used in multiple places throughout the tutorial. It looks like this:
https://[YOUR_GLITCH_APP_NAME].glitch.me/You would also notice that there are a couple of files called `.env` & `env.example` in your project (near red circle 2). The `.env` file contains the secrets and configurations associated with our app. You would notice a key icon next to it - this means that the contents of the file are visible only to you. The `.env.example` file is a sample file that makes it easier for you to imagine what a proper `.env` file would look like.
In the next step, we will be filling in the `.env` file starting from Pipedrive OAuth settings (Client id, Client secret, Callback URL). Once the configuration is done, we will see how our app handles authorization with Pipedrive (indicated by red circle 3).
4. Configuring Pipedrive OAuth settings
To register an app in Pipedrive, please follow these steps. For now, it is sufficient to have only the basic scope. Remember the live URL that we noted down in the previous step? We need that to specify the callback URL during app registration. It should be in this format:
https://[YOUR_GLITCH_APP_NAME].glitch.me/auth/pipedrive/callbackOnce you have completed the app registration, you'll be shown the ClientID and Secret details as shown below
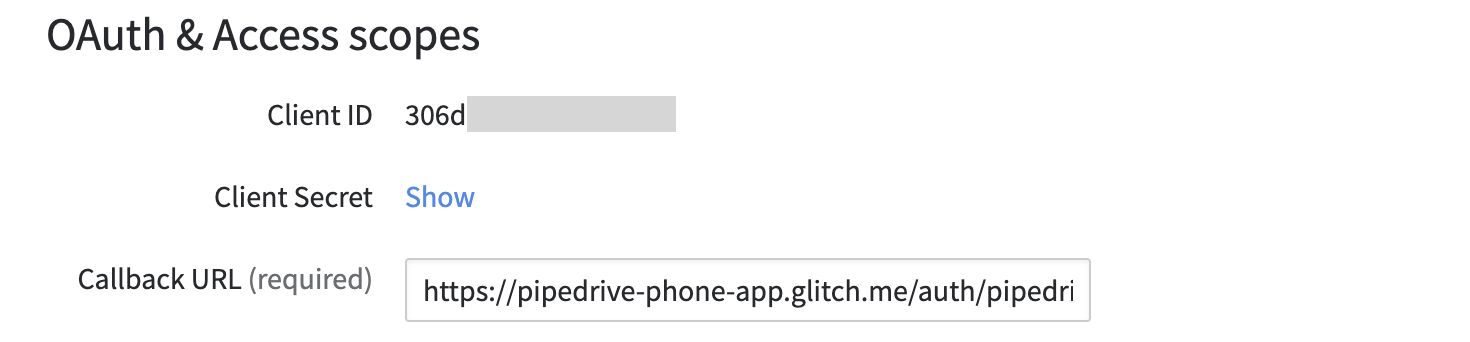
Copy the Client ID, Secret, and callback URL details and provide them in the `.env` file.
Our app already contains the logic required for authorization in the `server.js` & `routers/pipedrive.js` files under the `server` directory. We make use of the Passport library to build the authentication logic with Pipedrive. As you can see, upon successful authorization, we persist the access and refresh token along with the user details securely.
To make sure every request to our app is authorized, we have a middleware to check the same. If no access token is present, the user will be redirected to the authorization page again, and a new token will be obtained.
pipedrive.js, L47
// Redirect to Pipedrive OAuth if users lack authorization
router.use((req, res, next) => {
   if (req.user.length < 1) {
       return res.redirect('/auth/pipedrive');
   } else {
       next();
   }
});
Until now, we have set up the backend logic required for authenticating with Pipedrive. In the next step, we'll include vendor-specific logic that would enable the caller functionality in our app. Specifically, we'll use Twilio and integrate with them to implement our phone solution.
5. How to use Twilio APIs & SDKs in our app
As for any phone solution, there's usually an underlying platform offered by the vendor. In our case, we'll be using Twilio's Programmable Voice to implement the caller functionality. Regardless of the vendor we use, it is important to understand how the interactions work before using them in our application.
Check out the high-level flow for creating the integration.
Twilio provides purchasable phone numbers with trial credits using which we can make inbound and outbound calls.
In the case of an incoming call (to a number that you own), it first reaches Twilio. For every number that you own, you can specify a webhook URL that provides the instructions on how to handle it. These instructions are provided in the form of TwiML (Twilio Markup Language) and can be used to read a text to the caller, play some music, read the digits that the user is keying in, or just directly dial your number the good old way. And of course, you can use them all together if you are building an IVR (Interactive Voice Response) system.
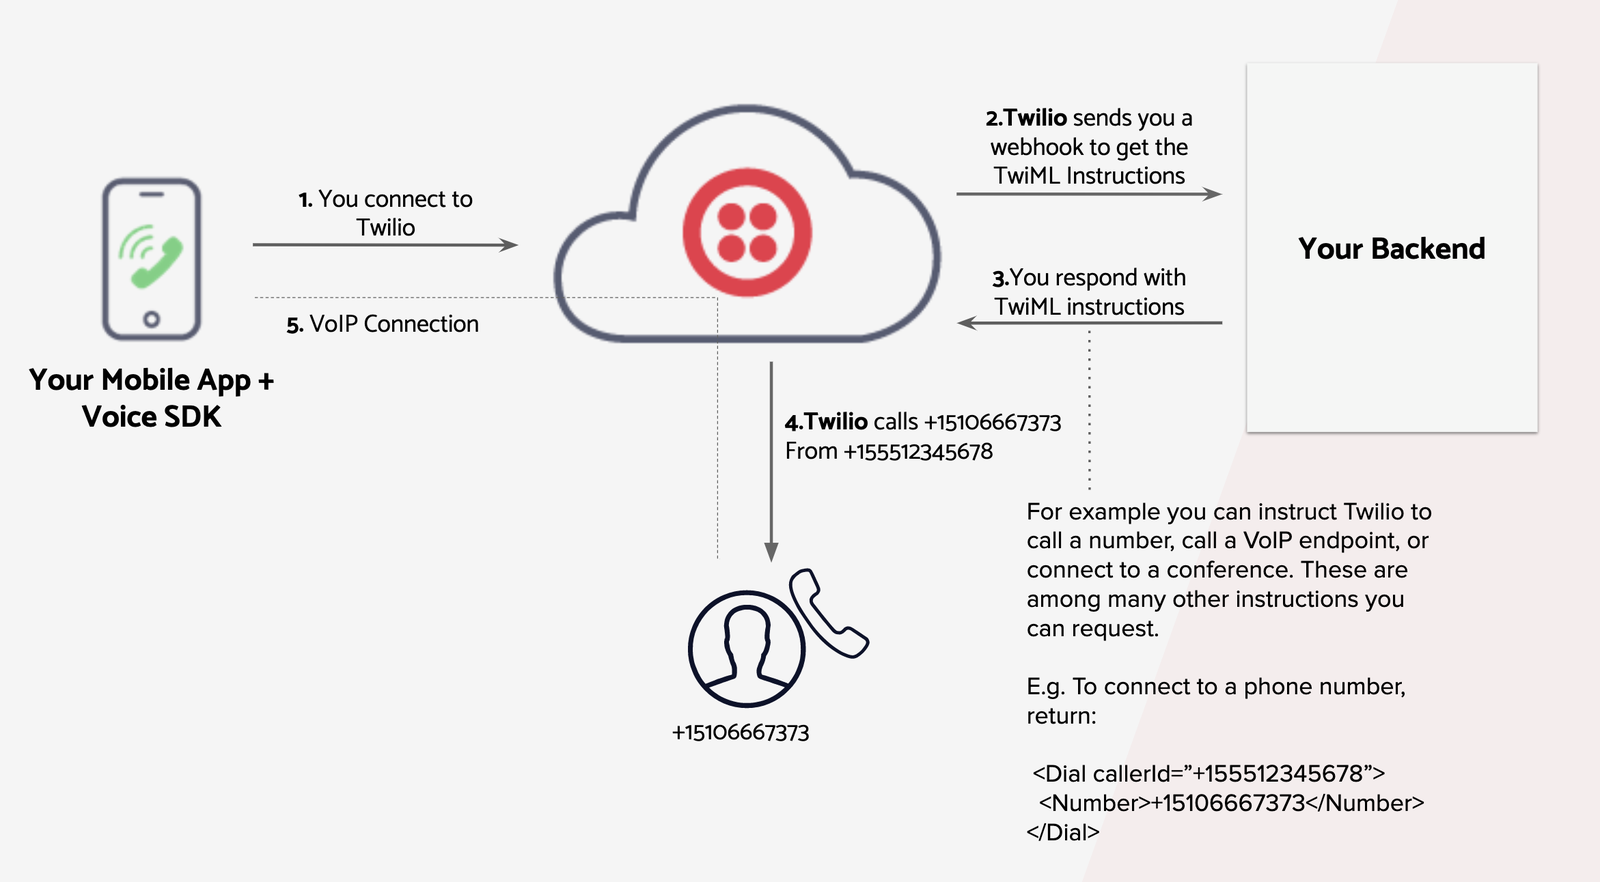
For an outgoing call, the flow is quite similar, and the TwiML instructions can be used to set the behavior. In either case, the webhook URL that responds with TwiML instructions can be easily built into our app using Twilio SDKs as one of the routes (similar to the `routers/ pipedrive.js` file).💯
Now that we have seen how the interactions work on the backend side of things, it is equally important to focus on the frontend. Citing the Twilio docs:
The Twilio Voice JavaScript SDK allows you to make voice calls to and from a web browser and a Twilio TwiML Voice Application. This means you can open inbound and outbound audio connections to Twilio for building softphones, walkie-talkies, conference calls, click-to-talk systems, and more, all from the browser.
There's some configuration that needs to be done on Twilio's side before we start coding again. Let's take a look at it.
6. Let's configure Twilio, and the .env file
Make sure you purchase at least one phone number using the Twilio free credits. Once you have an active phone number, you can notice it in the Twilio Console under the Phone numbers section.
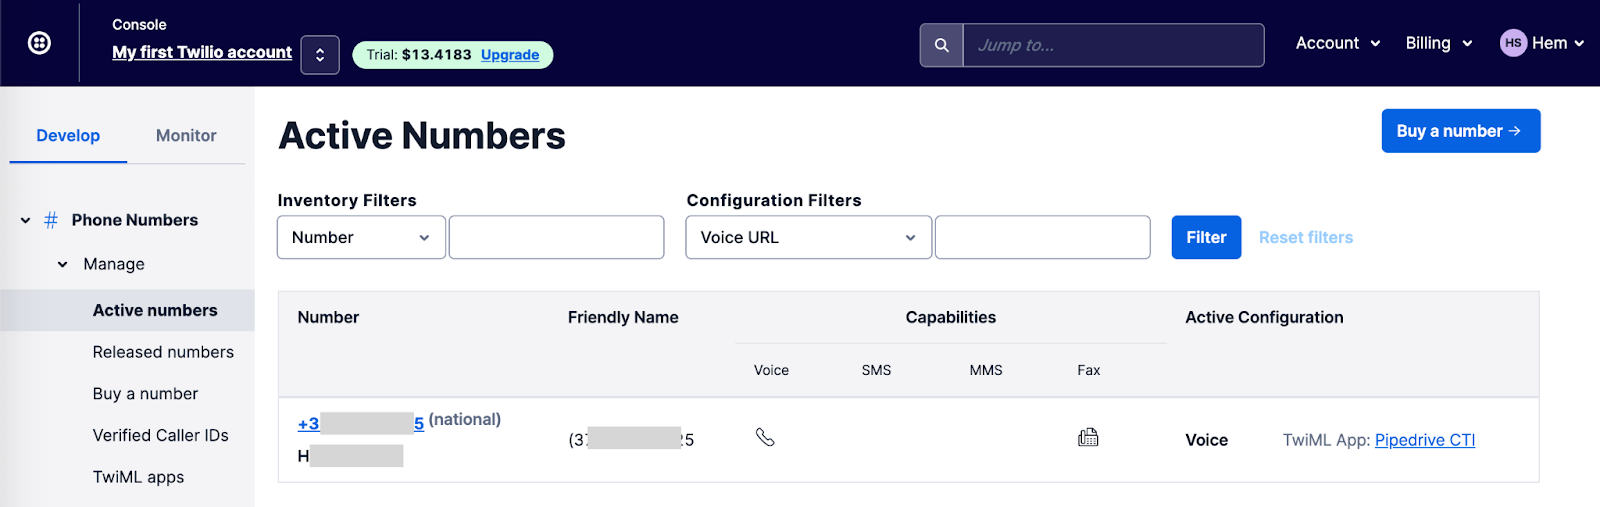
But what's that ‘TwiML App: Pipedrive CTI' thing at the end of the row?
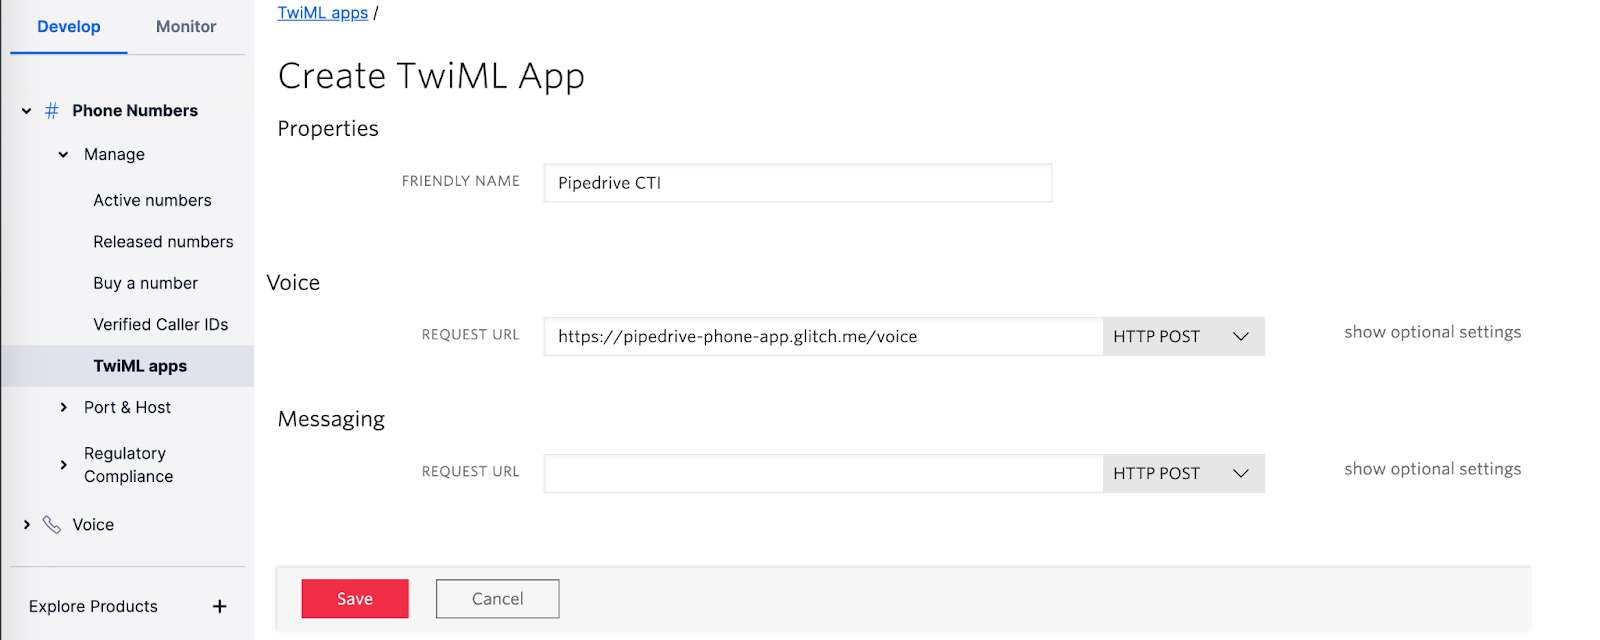
We saw how TwiML instructions are essential for handling calls in the previous step. Twilio offers TwiML apps that link our CTI app with their platform. Configuring them is straightforward:
- Go to Phone Numbers → Manage → TwiML Apps.
- Click on the ‘+' icon on top to create a TwiML app.
- Once you see the creation page, enter the name and request URL.
- The request URL is a combination of our Live app URL +
`/voice`
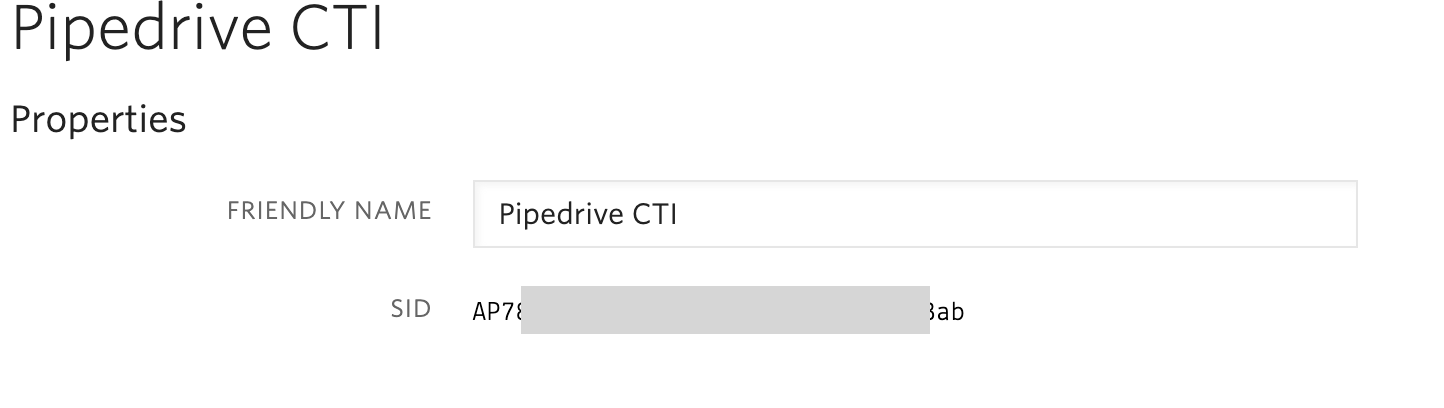
Note down the SID of the TwiML App as you'll need to add it to the `.env` file.
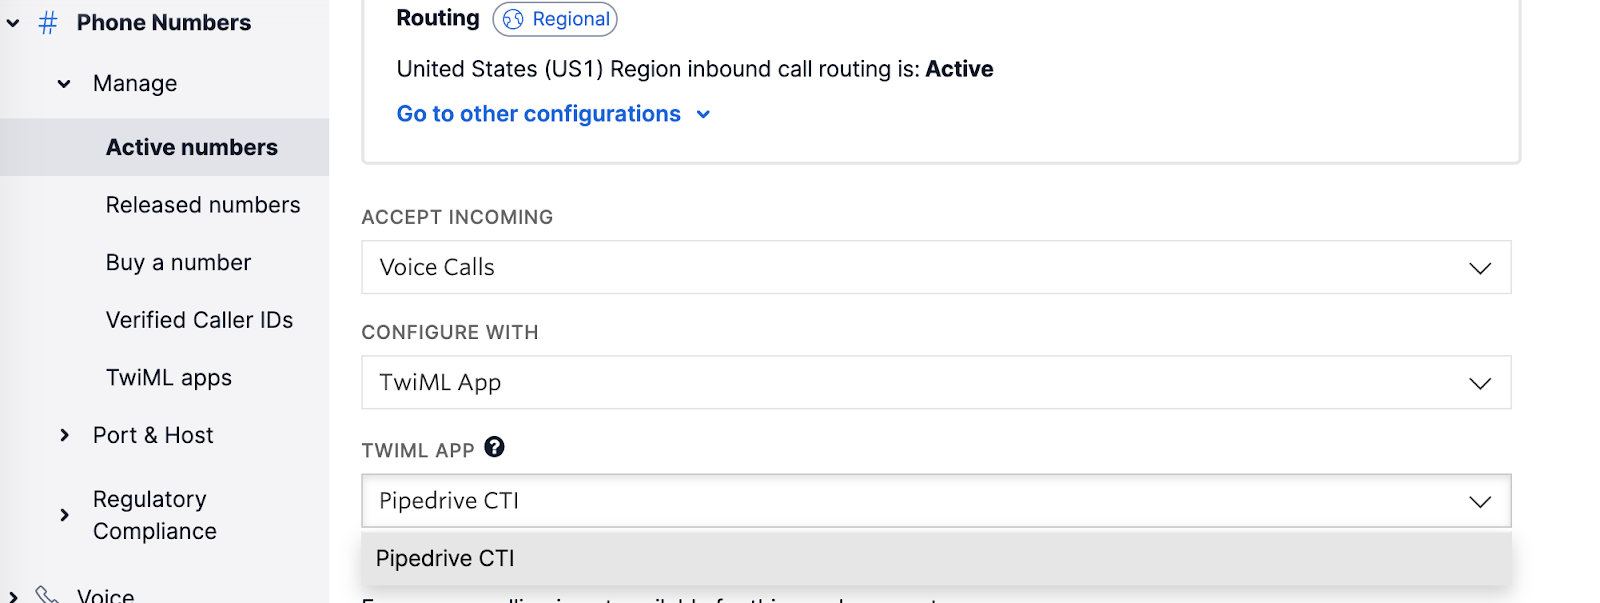
Now that we have created the TwiML app, we can link it back to the active number that we own. Just go to the Active Numbers → Click the number that you use → Configure Accept Incoming, Configure With & TwiML App settings as shown in the screenshot below.
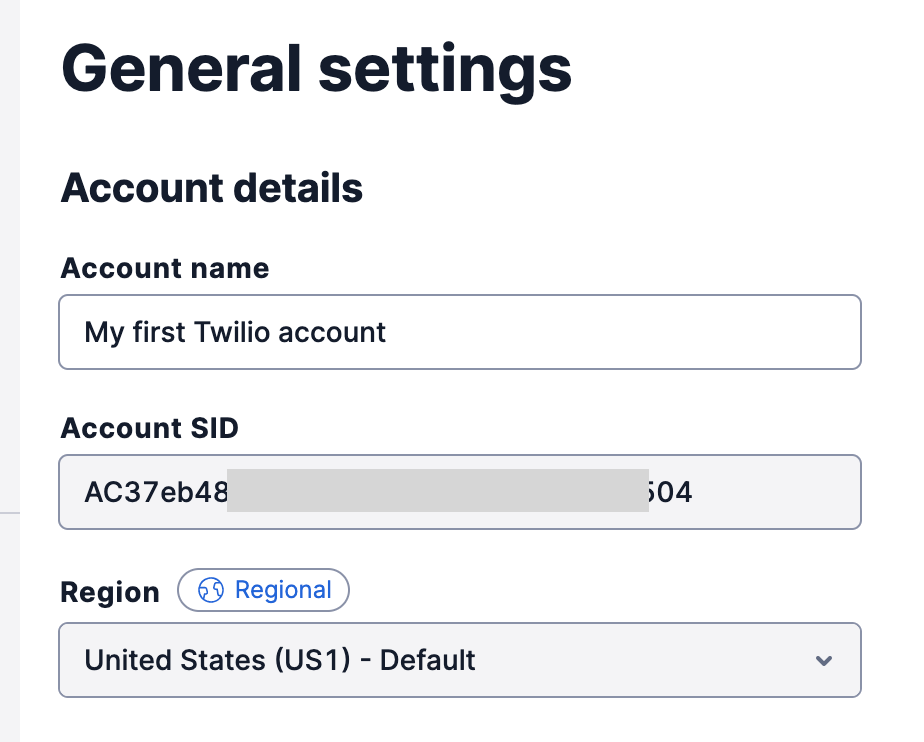
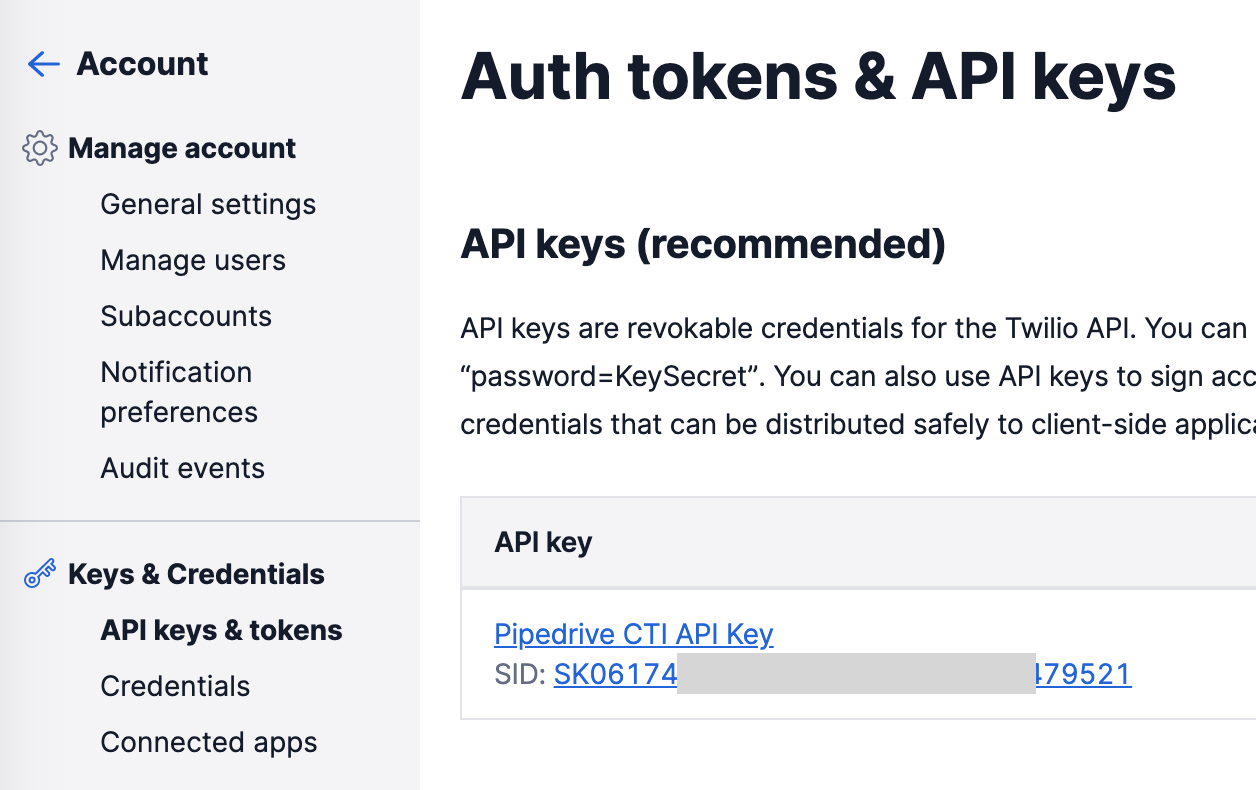
We would also require the Twilio account SID and API key details. You can access them by clicking on the Account menu in the navbar. Make sure you copy the API secret as it will not be shown again.
|
|
Once you have the required details, make sure you add them to the `.env` file. This is what your filled-in `.env` file should look like.
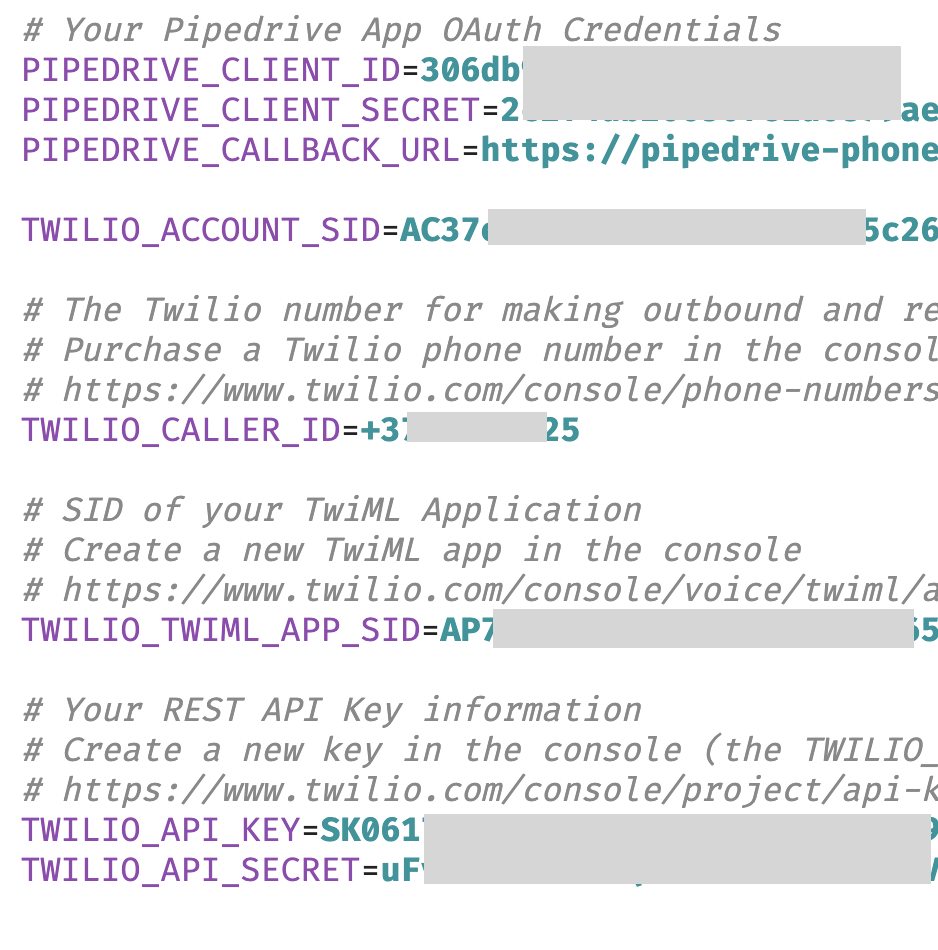
Alright, we covered a lot of things in this particular step. So a quick recap of this step:
What we've covered
- Purchased a phone number in Twilio using Trial credits,
- Enabled Geo-Permissions for the respective country,
- Created a TwiML app and configured it with our CTI app endpoint,
- Noted down the TwiML app SID,
- Noted down the Twilio Account SID,
- Noted down API key SID and secret,
- Populated the
`.env`file with all the required values,
7. Backend logic for handling incoming and outgoing calls
So far we've created a simple Pipedrive app that can successfully authorize itself and is publicly accessible. We've also configured Twilio (our CTI vendor) with the required URLs to handle inbound and outbound calls. In this step, we'll implement the logic required for handling the calls.
As said earlier, the TwiML instructions are at the core of the logic, and thus we will look at implementing the same at the `/voice` endpoint.
Let's take a look at the `twilio_handler.js` file. From Twilio's perspective, both inbound and outbound calls arrive as requests with varying parameters. A simple way to decide is to look at the `To` parameter.
Depending on whether the number in To is your own number or a different number, the call direction is determined.
For an inbound call, the `To` parameter is the same as the value provided in the `TWILIO_CALLER_ID` environment variable (`.env` file). In that case, a VoIP connection is established with the browser using the following command. Note that the `identity` is a dynamic value generated during the time of authentication with Twilio.
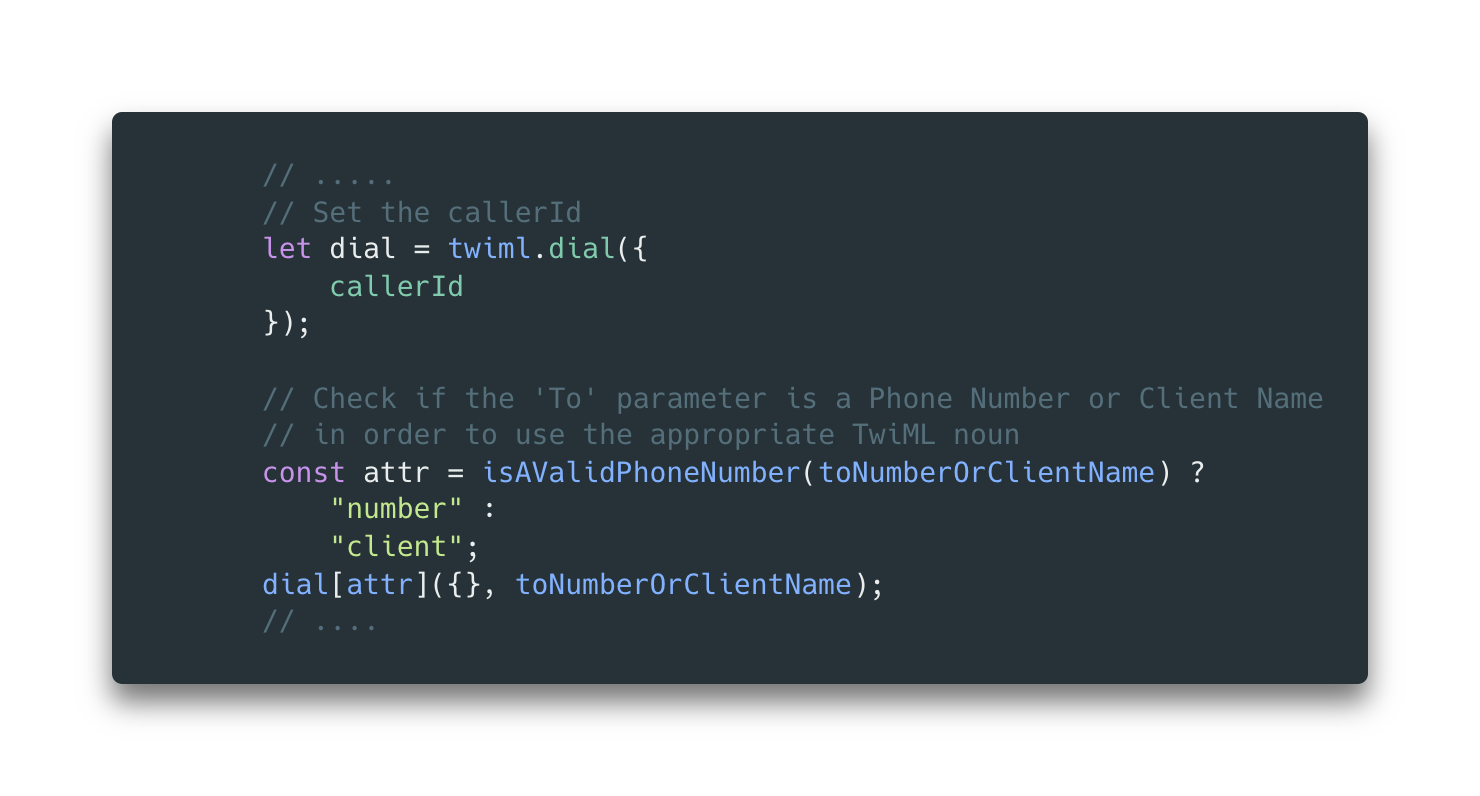
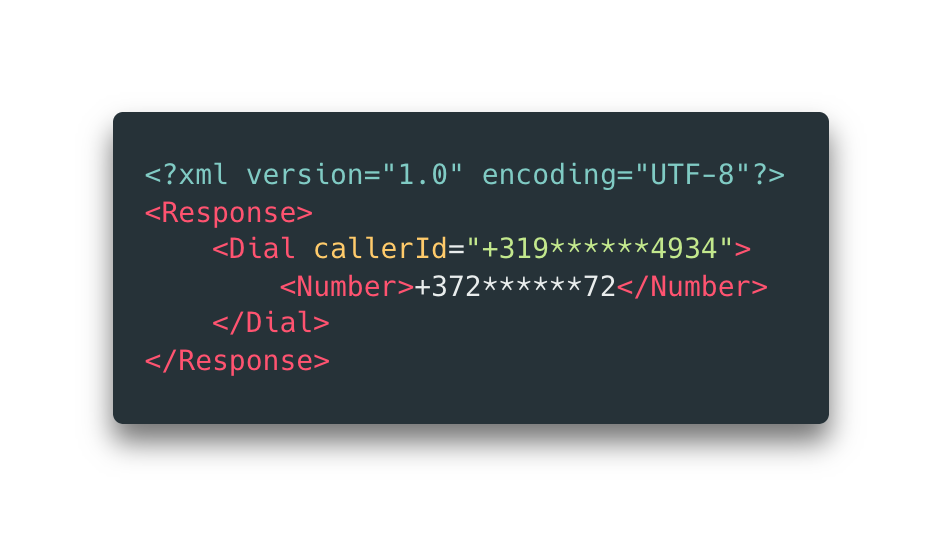
dial.client(identity);For an outbound call, the `To` parameter is a number other than the number you own, and thus, a TwiML instruction to dial directly is provided using the SDK. The equivalent TwiML representation is shown on the side.
Code | Equivalent TmiML |
|
|
It's as straightforward as that. If you are wondering about the authentication logic with Twilio, it is contained in the `tokenGenerator()` function. This allows the frontend to authenticate and obtain a unique ID (also referred to as identity) along with a valid token that can also be used to make or receive calls.
In the next step, we'll see how our custom-built frontend works in conjunction with the backend.
8. Building the frontend - the overall layout
Here's a sneak peek of the frontend. It contains the functional bare minimum for our phone solution. To keep things simple, we have used Bootstrap and jQuery to build it.
If we take a closer look at `public/index.html`, you can notice that we are authenticating with Twilio inside the `startupClient()` function. It communicates with the `/voice` endpoint to retrieve an access token and identity which will be used to identify the browser client.
In the `initializeDevice()` function, we pass the token to instantiate the TwilioDevice. This `device` is the softphone that would let us dial numbers and receive calls from the UI.
           device = new Twilio.Device(token, {
               logLevel: 1,
               codecPreferences: ["opus", "pcmu"],
           });
An important step after obtaining a valid Twilio Device is to register the handlers for inbound and outbound calls. The `addDeviceListeners()` function takes care of that. The following line in the `audioDevices.js` file can be used to obtain device permissions from the user to access the microphone and speakers.
async function getAudioDevices() {
   await navigator.mediaDevices.getUserMedia({
       audio: true
   });
   updateAllAudioDevices.bind(device);
}
9. Handling incoming and outgoing calls via frontend
When the user accesses the root of the application, they are served with the static files situated in the public directory. As we saw from the previous step, the layout is straightforward and requires instantiating `Twilio.Device` before active usage.
This is how it looks before instantiation:
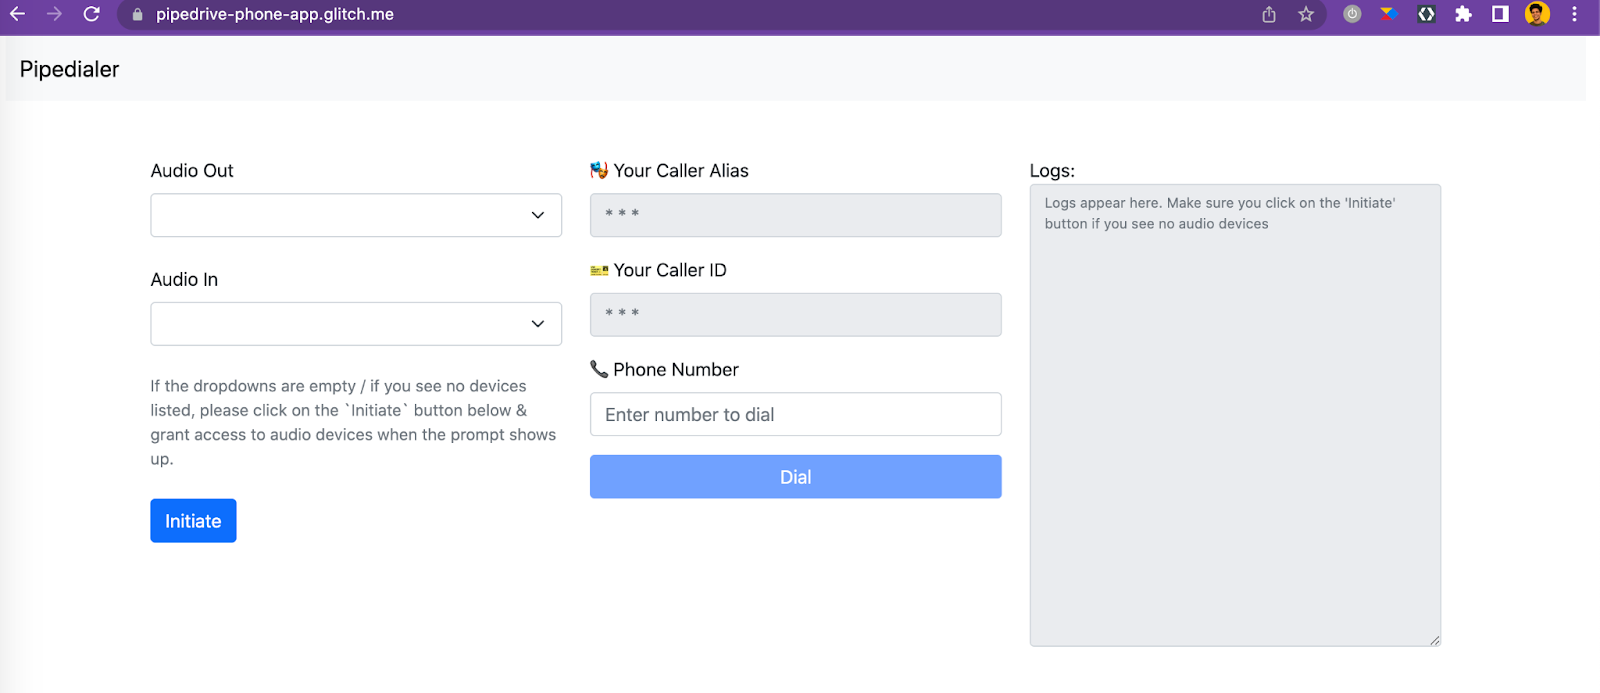
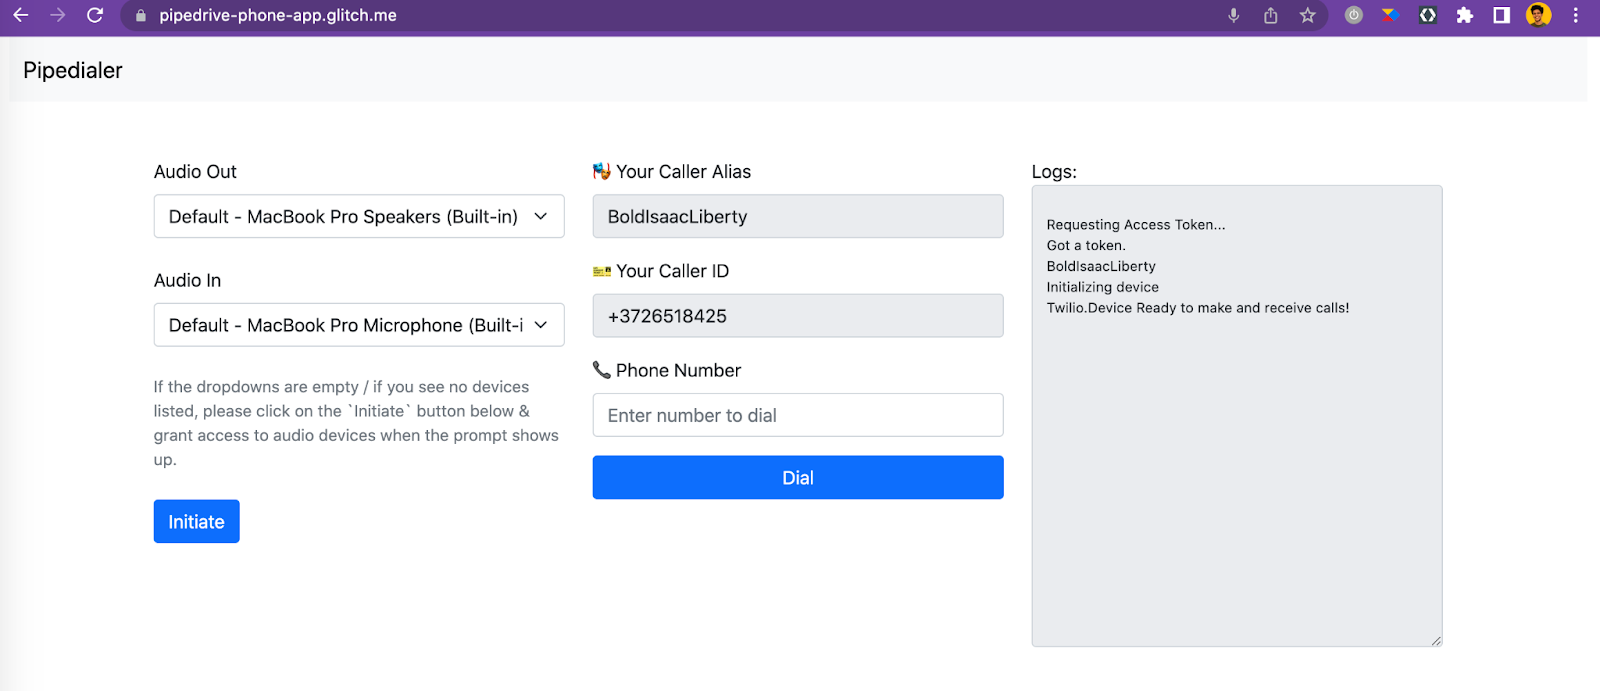
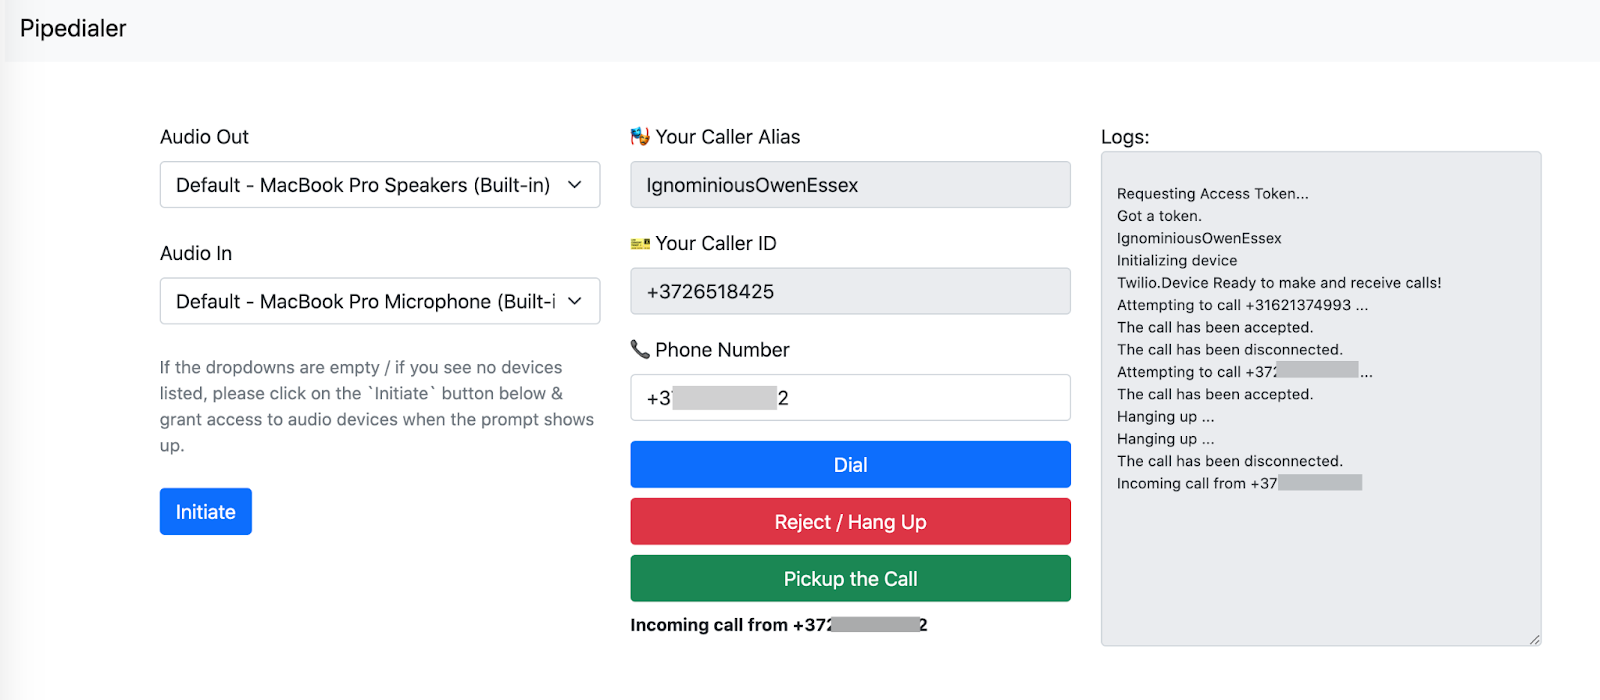
Upon clicking the `Initiate` button, the audio devices are fetched, and an authorization token is obtained along with the identity (shown as Caller Alias). Notice that the browser does not have access to audio devices until the user provides authorization.
The files responsible for handling outgoing and incoming calls can be found under the `public/lib/` directory.
For outgoing calls, you can find the corresponding logic in the `outgoingCallHandler.js` file.
The following code reads the phone number provided in the input and initiates a call.
You can find the complete list of methods to create/reject/accept calls in Twilio's docs. The state of the buttons also changes accordingly, allowing you to hang up / reject calls. Here's how it looks during outgoing and incoming calls.
Outgoing
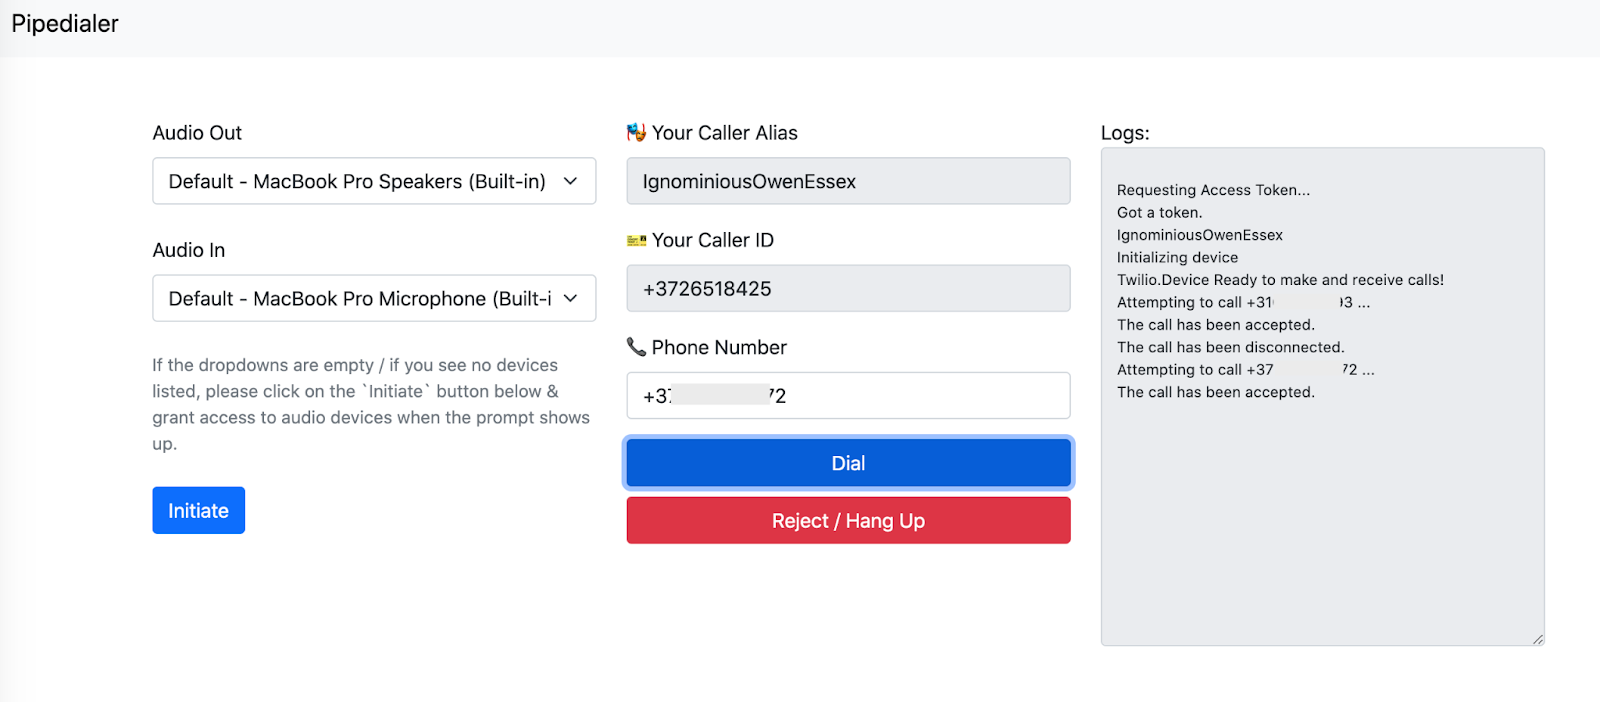
Incoming
You can access the app via the Live URL at `https://[your_app].glitch.me`
10. Your Turn 🚩
What we have covered so far allows us to do the following:
- Authenticate with Pipedrive and get access to the API
- Incorporate vendor-specific logic into our app
- Enable backend and frontend to work together with the help of vendor SDKs and APIs
- Using it to make inbound and outbound from our app
From here, the possibilities are endless depending on what the business wants to achieve. For instance, in the following steps,
- You can obtain the list of contacts and auto-populate the phone number with recommendations
- Create a follow-up activity after hanging up the call
- Create an automated voice responder for generating leads
Hope you enjoyed the tutorial. We are looking forward to hearing from you!
